The advantage of CNTK is not only performance, but it can also support multiple devices (GPUs) or multiple machines with the flexible way by built-in capabilities and rapidly scale along with the number of processes.
In my old post I showed the idea of distributed training with MXNET and R samples (see “Accelerate Mxnet R trainig by GPUs and multiple machines“). Here I show you the same technique with Cognitive Toolkit (CNTK).
This post doesn’t go so far about distributed algorithms, but I hope this article helps you to start distributed training with a variety of platform, services or libraries (like Azure Batch AI, Azure Databricks, etc).
In this post we use python, but you can also use with CNTK R bindings.
Setting-up your machines
Before staring, you must provision and configure your computing machines (nodes) as follows. If you run the distributed training with multiple machines, all machines should be configured as same.
- Configure the network for inter-nodes’ communication.
- When using GPUs, install (compile) and configure the drivers and related libraries (cuda, cudnn, etc).
- Install and setup OpenMPI on multiple machines.
- Put the following program (.py) and data on all multiple machines. It’s better to use NFS shared (mounted) directory and place all files on this directory.
Moreover you must setup the trust between host machines.
Here we create the key pair on my machine using the following command. (The key pair “id_rsa” and “id_rsa.pub” are generated in .ssh folder. During creation, we set blank (null) to the certificate password.)
After that, you copy the generated public key (id_rsa.pub) into {home of the same user id}/.ssh directory on other remote machines. The file name must be changed to “authorized_keys”.
ssh-keygen -t rsa

ls -al .ssh

drwx------ 2 tsmatsuz tsmatsuz 4096 Feb 21 05:01 .
drwxr-xr-x 7 tsmatsuz tsmatsuz 4096 Feb 21 04:52 ..
-rw------- 1 tsmatsuz tsmatsuz 1766 Feb 21 05:01 id_rsa
-rw-r--r-- 1 tsmatsuz tsmatsuz  403 Feb 21 05:01 id_rsa.pub
Let’s confirm that you can pass the command (pwd) to the remote hosts with the following command without any prompt. If succeeded, the current working directory on the remote host will be returned. (Here we assume that 10.0.0.5 is the ip address of the remote host.)
ssh -o StrictHostKeyChecking=no 10.0.0.5 -p 22 pwd

/home/tsmatsuz
The easiest way for provisioning is to use Data Science Virtual Machine (DSVM) in Azure computing, or use docker image (microsoft/cntk:2.1-gpu-python3.5-cuda8.0-cudnn6.0, etc) with docker clusters. Using DSVM, you don’t need to setup all the dependent libraries and there are all automatically pre-configured including TensorFlow, CNTK, MXNet, etc with GPU utilized. The only thing you have to do is to configure the inter-node’s communications.
You can also use the InfiniBand network for inter-communication with Azure infrastructure.
Note : In my next post I’ll show you the most easiest way for provisioning with Azure Batch AI. Using Batch AI, you can provision your computing nodes including inter-node communication’s configuration with only one command !
Our Sample – Single process
Now let’s start programming. Here we use the brief MNIST (hand-writing image’s) sample.
First you can download the sample data (Train-28x28_cntk_text.txt and Test-28x28_cntk_text.txt) from Batch AI sample (BatchAIQuickStart.zip). These data are CNTK text format (CTF) with the probability (0 – 1) as “labels” and 28 x 28 (=784) gray-scale pixel data (0-255) as “features” as follows.
Train-28x28_cntk_text.txt, Test-28x28_cntk_text.txt
|labels 0 0 0 0 0 0 0 1 0 0 |features 0 3 18 18 126...
|labels 0 1 0 0 0 0 0 0 0 0 |features 0 0 139 0 253...
...
Here we start with the following brief training code with convolutional neural network (LeNet). As you can see, this code save the trained model after the training is done.
Train_MNIST.py
import numpy as np
import sys
import os
import cntk

# folder which includes "Train-28x28_cntk_text.txt"
data_path = sys.argv[1]
# folder for model output
model_path = sys.argv[2]

def train_mnist():
  # variables denoting the features and label data
  input_var = cntk.input_variable((1, 28, 28))
  label_var = cntk.input_variable(10)

  # instantiate the feedforward classification model
  with cntk.layers.default_options(
    init = cntk.layers.glorot_uniform(),
    activation=cntk.ops.relu):
    h = input_var/255.0
    h = cntk.layers.Convolution2D((5,5), 32, pad=True)(h)
    h = cntk.layers.MaxPooling((3,3), (2,2))(h)
    h = cntk.layers.Convolution2D((3,3), 48)(h)
    h = cntk.layers.MaxPooling((3,3), (2,2))(h)
    h = cntk.layers.Convolution2D((3,3), 64)(h)
    h = cntk.layers.Dense(96)(h)
    h = cntk.layers.Dropout(0.5)(h)
    z = cntk.layers.Dense(10, activation=None)(h)

  # create source for training data
  reader_train = cntk.io.MinibatchSource(
    cntk.io.CTFDeserializer(
      os.path.join(data_path, 'Train-28x28_cntk_text.txt'),
      cntk.io.StreamDefs(
        features = cntk.io.StreamDef(field='features', shape=28 * 28),
        labels = cntk.io.StreamDef(field='labels', shape=10)
      )),
      randomize=True,
      max_sweeps = cntk.io.INFINITELY_REPEAT)

  # create trainer
  epoch_size = 60000
  minibatch_size = 64
  max_epochs = 40

  lr_schedule = cntk.learning_rate_schedule(
    0.2,
    cntk.UnitType.minibatch)
  learner = cntk.sgd(
    z.parameters,
    lr_schedule)

  progress_printer = cntk.logging.ProgressPrinter(
    tag='Training',
    num_epochs=max_epochs)
  ce = cntk.losses.cross_entropy_with_softmax(
    z,
    label_var)
  pe = cntk.metrics.classification_error(
    z,
    label_var)
  trainer = cntk.Trainer(
    z,
    (ce, pe),
    learner,
    progress_printer)

  # define mapping from reader streams to network inputs
  input_map = {
    input_var : reader_train.streams.features,
    label_var : reader_train.streams.labels
  }

  cntk.logging.log_number_of_parameters(z) ; print()

  # Train with minibatches
  for epoch in range(max_epochs):
    sample_count = 0
    while sample_count < epoch_size:
      # fetch minibatch
      data = reader_train.next_minibatch(
        min(minibatch_size, epoch_size - sample_count),
        input_map=input_map)
      # update model with it
      trainer.train_minibatch(data)
      # count samples processed so far
      sample_count += data[label_var].num_samples

    # print result
    trainer.summarize_training_progress()

  # save model
  z.save(
    os.path.join(
      model_path,
      "ConvNet_MNIST.dnn".format(epoch)))

  return

if __name__=='__main__':
  train_mnist()
After model is created, you can load the generated model and predict (evaluate) the values from the hand-writing images as follows.
Test_MNIST.py
import numpy as np
import sys
import os
import cntk
from cntk.ops.functions import load_model

# folder which includes "Test-28x28_cntk_text.txt"
data_path = sys.argv[1]
# folder for model data
model_path = sys.argv[2]

def test_mnist():
  # variables denoting the features and label data
  input_var = cntk.input_variable((1, 28, 28))
  label_var = cntk.input_variable(10)

  # load model
  z = load_model(os.path.join(
    model_path,
    "ConvNet_MNIST.dnn"))
  out = cntk.softmax(z)

  # load test data
  reader_test = cntk.io.MinibatchSource(
    cntk.io.CTFDeserializer(
      os.path.join(data_path, 'Test-28x28_cntk_text.txt'),
      cntk.io.StreamDefs(
        features  = cntk.io.StreamDef(field='features', shape=28 * 28),
        labels = cntk.io.StreamDef(field='labels', shape= 10)
      )),
      randomize=False,
      max_sweeps = 1)

  # fetch first 25 rows as min batch.
  test_size = 25
  data = reader_test.next_minibatch(
    test_size,
    input_map={
      input_var : reader_test.streams.features,
      label_var : reader_test.streams.labels
    })
  data_label = data[label_var].asarray()
  data_input = data[input_var].asarray()
  data_input = np.reshape(
    data_input,
    (test_size, 1, 28, 28))

  # predict
  predicted_result = [out.eval(data_input[i]) for i in range(len(data_input))]

  # find the index with the maximum probability
  pred = [np.argmax(predicted_result[i]) for i in range(len(predicted_result))]

  # actual label
  actual = [np.argmax(data_label[i]) for i in range(len(data_label))]

  # print result !
  print("Label:", actual[:25])
  print("Predicted:", pred)

  return

if __name__=='__main__':
  test_mnist()
This code can run with only one single process. When you run this code, you can get the array of predicted values and actual (true) values as follows. (See the output result.)
# train and save the model
python Train_MNIST.py /home/tsmatsuz/work /home/tsmatsuz/work/model
# evaluate (predict) with generated model
python Test_MNIST.py /home/tsmatsuz/work /home/tsmatsuz/work/model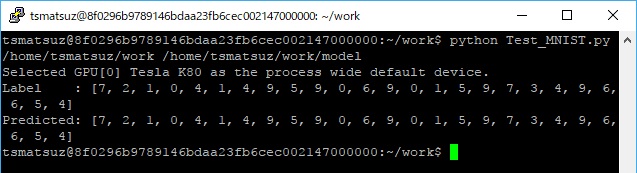
Modify our code for distributed training
With CNTK’s built-in functions, you can easily change your program for the distributed training.
Here is our code for the distributed training version. (The highlighted line is the modified code.)
As you can see, you can use the built-in learner for distributed training (data_parallel_distributed_learner) instead of the local learner. Moreover, instead of using train_minibatch() method, you must define the training session (session = training_session(...)) and start this session with session.train().
Train_MNIST.py (Distributed)
# modified for the distributed training
# (see highlighted)

import numpy as np
import sys
import os
import cntk
from cntk.train.training_session import *

# folder which includes "Train-28x28_cntk_text.txt"
data_path = sys.argv[1]
# folder for model output
model_path = sys.argv[2]

# Creates and trains a feedforward classification model for MNIST images
def train_mnist():
  # variables denoting the features and label data
  input_var = cntk.input_variable((1, 28, 28))
  label_var = cntk.input_variable(10)

  # instantiate the feedforward classification model
  with cntk.layers.default_options(
    init = cntk.layers.glorot_uniform(),
    activation=cntk.ops.relu):
    h = input_var/255.0
    h = cntk.layers.Convolution2D((5,5), 32, pad=True)(h)
    h = cntk.layers.MaxPooling((3,3), (2,2))(h)
    h = cntk.layers.Convolution2D((3,3), 48)(h)
    h = cntk.layers.MaxPooling((3,3), (2,2))(h)
    h = cntk.layers.Convolution2D((3,3), 64)(h)
    h = cntk.layers.Dense(96)(h)
    h = cntk.layers.Dropout(0.5)(h)
    z = cntk.layers.Dense(10, activation=None)(h)

  # create source for training data
  reader_train = cntk.io.MinibatchSource(
    cntk.io.CTFDeserializer(
      os.path.join(data_path, 'Train-28x28_cntk_text.txt'),
      cntk.io.StreamDefs(
        features = cntk.io.StreamDef(field='features', shape=28 * 28),
        labels = cntk.io.StreamDef(field='labels', shape=10)
      )),
      randomize=True,
      max_samples = 60000,
      multithreaded_deserializer=True)

  # create trainer
  epoch_size = 60000
  minibatch_size = 64
  max_epochs = 40

  lr_schedule = cntk.learning_rate_schedule(
    0.2,
    cntk.UnitType.minibatch)
  learner = cntk.sgd(
    z.parameters,
    lr_schedule)
  dist_learner = cntk.train.distributed.data_parallel_distributed_learner(
    learner = learner,
    num_quantization_bits=32, # non-quantized SGD
    distributed_after=0) # all data is parallelized

  progress_printer = cntk.logging.ProgressPrinter(
    tag='Training',
    num_epochs=max_epochs,
    freq=100,
    log_to_file=None,
    rank=cntk.train.distributed.Communicator.rank(),
    gen_heartbeat=True,
    distributed_freq=None)
  ce = cntk.losses.cross_entropy_with_softmax(
    z,
    label_var)
  pe = cntk.metrics.classification_error(
    z,
    label_var)
  trainer = cntk.Trainer(
    z,
    (ce, pe),
    dist_learner,
    progress_printer)

  # define mapping from reader streams to network inputs
  input_map = {
    input_var : reader_train.streams.features,
    label_var : reader_train.streams.labels
  }

  cntk.logging.log_number_of_parameters(z) ; print()

  session = training_session(
    trainer=trainer,
    mb_source = reader_train,
    model_inputs_to_streams = input_map,
    mb_size = minibatch_size,
    progress_frequency=epoch_size,
    checkpoint_config = CheckpointConfig(
      frequency = epoch_size,
      filename = os.path.join(
        model_path, "ConvNet_MNIST"),
      restore = False),
    test_config = None
  )
  session.train()

  # save model only by one process
  if 0 == cntk.Communicator.rank():
    z.save(
      os.path.join(
        model_path,
        "ConvNet_MNIST.dnn"))

  # clean-up distribution
  cntk.train.distributed.Communicator.finalize();

  return

if __name__=='__main__':
  train_mnist()
CNTK supports the several types of parallel (distributed training) algorithms, and here we’re using data-parallel training (data_parallel_distributed_learner), which distributes the workloads along with each mini batch data and aggregates (exchanges) the results from multiple processes. (Here we distribute only data and not using the quantized gradient methodology.)
See “CNTK – Multiple GPUs and Machines” for the details about parallel algorithms.
For example, when you run the following command in your computing host, 2 worker processes run in your computer and exchange the results each other.
After the training is done, only one process (rank=0) saves the trained model (ConvNet_MNIST.dnn) in the model folder.
Then you can evaluate (predict) using the generated model same as the above. (See Test_MNIST.py for prediction.)
mpiexec --npernode 2 python Train_MNIST.py /home/tsmatsuz/work /home/tsmatsuz/work/modelWhen you run on multiple computing machines (nodes), first you create the following hosts file in your working node. This file lists the computing nodes, on which the training workloads will be started by MPI. (Here we use only 2 nodes for distributed training.)
hosts
10.0.0.4 slots=1 # 1 worker on node0
10.0.0.5 slots=1 # 1 worker on node1
Next you locate the program (Train_MNIST.py) and data (Train-28x28_cntk_text.txt) in the shared (mounted) folder, and make sure that every nodes can access both program and data.
Finally, run the following command in your working node. (“/mnt/test” is the shared folder and “eth0” is the network interface name on my working node.)
Before training, CNTK will seek for the infiniband network and it’s automatically used if available. Then the training workloads will run on all nodes in parallel and the results are exchanged.
Note: You can suppress the lookup for the infiniband network with “-mca btl ^openib” option.
mpiexec --mca btl_tcp_if_include eth0 \
  --hostfile hosts \
  python /mnt/test/Train_MNIST.py /mnt/test /mnt/test/model
Next time I’ll show you about Azure Batch AI. You will find how easy it’s for the distributed training workloads ! (This post is the preparation for the next lesson…)
[Reference]
Cognitive Toolkit – Multiple GPUs and Machines
https://docs.microsoft.com/en-us/cognitive-toolkit/Multiple-GPUs-and-machines
Categories: Uncategorized

Hi, Thanks for sharing about distributed training. Since I am about to pivot my source to cntk base, could you let me know how to create MinibatchSource from numpy arrays(image files+label files) as an input.
LikeLike
Hi yj-san. Please use MinibatchSourceFromData instead.
LikeLike
Hi, Tsuyoshi san, Thanks for replying. I used MinibatchSourceFromData as you said. To run my code on multiple nodes with multiple gpus, I wrote “mpiexec -n 64 -npernode 4 ${node.info.file} python3 {exce file}” on my script. but in this case, 64 threads just execute the same .py file individually(the same execution 64 times. it also causes some errors on runtime). is there any way to use mutex or lock mpi threads on a code level?(for排他処理) The normal python mutex function was not working for this for sure. Sorry for bothering you, I hope you could help me for this. Thanks!
LikeLike
I understood your concerns.
In usual “MinibatchSource”, you can specify “num_data_partitions” and “partition_index” in “next_minibatch” method to read different partition in different nodes. See the following example, which is specifying “partition_index = cntk.Communicator.rank()” to read different partition each other.
https://github.com/Microsoft/CNTK/blob/master/bindings/python/cntk/learners/tests/distributed_multi_learner_test.py
I’m sorry I haven’t ever tried this case, but how about to use “number_of_workers” and “worker_rank” in “MinibatchSourceFrom”, same as previous “num_data_partitions” and “partition_index” in “MinibatchSource” ?
LikeLike
Thanks for the info and the example. But I still need to know how to lock(mutex) processes(threads) for loading files from HDD unless all processes(nodes) try to read the same files individually. Since each process loads train files separately, the order(sequence) of files are all different on each node. so that I can’t separate train files to nodes properly. I hope you coud help me with this. Thanks again.
LikeLike
Tsuyoshi san, I solved my own problem. Thanks for the answers. I just wonder, is there a decent way to convert numpy arrays(image data) to a CTF typed txt file ? I want to use MinibatchSource to manipulate data.
LikeLike
Hi yj-san, sorry for my late response. (because of the preparation for participating events as a speaker etc…)
In the script in github repo, it includes script for only text-to-ctf (see https://github.com/Microsoft/CNTK/blob/master/Scripts/txt2ctf.py), but almost all official samples in CNTK is writing from scratch (see https://github.com/Microsoft/CNTK/blob/master/Examples/Image/DataSets/CIFAR-10/cifar_utils.py), and sorry but it seems not having the built-in convert functionalities like tensorflow…
P.S. Can you share the solution for your “lock” problem ?
LikeLike
Thanks for your kind answer, Tsuyoshi-san.
For the p.s. question, well, MPI_Barrier(MPI_COMM_WORLD) could be used to synchronize all the MPI tasks.
Is there any way to directly read data from a directory on a runtime process? like “flow_from_directory” in keras?
Making a file (CFT format or else) from a large data set seems inefficient and could cause memory insufficiency…
Does CNTK has a library or functiom to do that? Sorry for bothering you several times. I am just trying to use cntk since it seems fast and accurate on a data training phase. Thanks always.
LikeLike
Hi,
Thank your for your share.
I am try to implement pagerank with cntk.
In page rank, we need to send and receive value from other workers.
I do not see any function to do that.
It is posible to implement page rank with cntk??
LikeLike
Tsuyoshi-san,
I second the question above, do you have any pointers to Reinforcement Learning or distributed learners with CNTK?
Thank you in advance
Alex M
LikeLike
Hi,
Both “Tutorials” and “Examples” in GitHub repo will cover a lot of scenarios in practical CNTK usage.
https://github.com/Microsoft/CNTK/tree/master/Tutorials
https://github.com/microsoft/CNTK/tree/master/Examples
LikeLike