The custom connector (API connector) enables you to connect your own web api (REST api) in Power Automate (including SharePoint workflow) and Power Apps. You can connect Power Automate and Power Apps with your in-house applications or unknown 3rd party (ISV) applications.
In this post I show you how to build and use the custom connector (API connector), and in most cases the authentication is needed, then I also explain with real authentication scenario. (First I explain using Azure AD, and next I show you the other cases, such as Google account.)
Note : Now you can submit your connector for certification and publication. (All users can access your connector.) See “Submit your connectors for Microsoft certification“. (Added on May 2017)
Note : You can now build and publish your API connector with Postman (see here), but here we create with custom swagger configuration. (Added on May 2017)
Build your own web api
In the first example, we use the Azure Active Directory (Azure AD) as the authentication provider with custom api connector.
In this case, your web api must handle the OAuth access token.
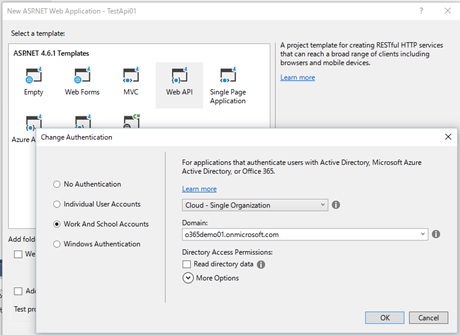
I don’t describe how to build the web api secured by the Azure AD, but if you’re using ASP.NET Web API, you just click [Change Authentication] button in the project creation wizard and set-up the Azure AD information. (See the following screen.)
If you’re using other programming language, see “How to build API secured by Azure AD” (Japanese) in my previous post.
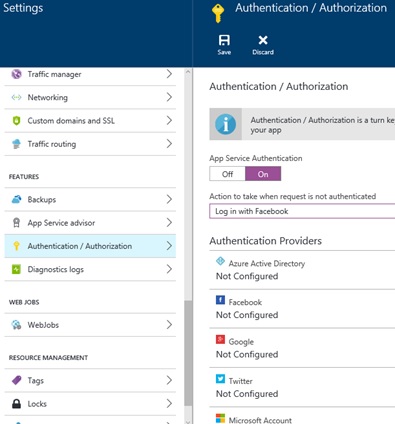
Note : You can also use the Azure App Service (API App) and [Authentication / Authorization] settings (so called “Easy Auth”) for every programming languages.
See “Azure App Service Authentication Deep Dive” (Japanese) for details.
Next you must prepare the swagger specification file (json file).
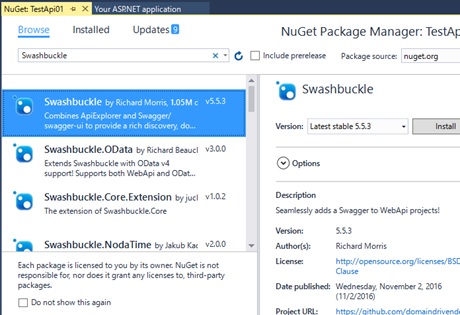
If you use ASP.NET Web API, you can insert “Swashbuckle” Nuget package and download this json by accessing http://{your root URL}/swagger/docs/v1.
The next is one of the swagger specification example. Especially, you must remember operationId value (the following “Values_Get”), because we use this operation in the Power Apps later.
In the swagger specification, you must add the following “securityDefinitions” section, and set Azure AD authentication information as follows.
{
  "swagger": "2.0",
  "info": {
    "version": "v1",
    "title": "TestApi01"
  },
  "host": "demo.azurewebsites.net",
  "schemes": [
    "https"
  ],
  "paths": {
    "/api/Values/{id}": {
      "get": {
        "tags": [
          "Values"
        ],
        "operationId": "Values_Get",
        "consumes": [

        ],
        "produces": [
          "application/json",
          "text/json",
          "application/xml",
          "text/xml"
        ],
        "parameters": [
          {
            "name": "id",
            "in": "path",
            "required": true,
            "type": "integer",
            "format": "int32"
          }
        ],
        "responses": {
          "200": {
            "description": "OK",
            "schema": {
              "type": "string"
            }
          }
        }
      },
      . . .

    }
  },
  "definitions": {
  },
  "securityDefinitions": {
    "oauth2": {
      "type": "oauth2",
      "flow": "implicit",
      "authorizationUrl": "https://login.windows.net/common/oauth2/authorize",
      "scopes": {

      }
    }
  }
}
If you use Swashbuckle in your ASP.NET Web API project, you just insert the following code (bold font) in App_StartSwaggerConfig.cs.
public class SwaggerConfig
{
  public static void Register()
  {
    var thisAssembly = typeof(SwaggerConfig).Assembly;

    GlobalConfiguration.Configuration
      .EnableSwagger(c =>
        {
          c.SingleApiVersion("v1", "TestApi01");
          . . .

          c.OAuth2("oauth2")
            .AuthorizationUrl("https://login.windows.net/common/oauth2/authorize")
            .Flow("implicit")
            .Scopes(scopes =>
            {
              //scopes.Add("xxxxx", "Some access to protected resources");
            });

        })
      .EnableSwaggerUi(c =>
        {
          . . .

        });
  }
}
Note (added Feb 2017) : If you use Azure App Services (including Azure Functions) for hosting your api, you can easily create your swagger definition with security configurations. See “PowerApps team blog : Making it easier to use Azure APIs in PowerApps” for more details.
Register APIs in Azure AD
In the case of Azure AD, the custom connector proxy in the Power Automate or Power Apps retrieves the access token for your web api resource, and calls your web api by setting this token in the http header.
i.e, you must register both the custom connector proxy app and your web api app in the Azure AD, and set the permission between custom connector proxy and your web api.
Note : If you have used the previous [Change Authentication] button in ASP.NET Web API, the web api app is already registered in Azure AD.
The following illustrates this.

When you register the custom connector proxy (Azure AD app of Power Automate or Power Apps side), you must add the following url (fixed value) as the redirect url. Both Power Automate and Power Apps uses this redirect url, when processing OAuth.
https://msmanaged-na.consent.azure-apim.net/redirectCurrently (in Nov 2016), the Azure AD v2 endpoint is not supported (but v1 only) for this scenario, and you must use the Azure Classic Portal (https://manage.windowsazure.com/), not Azure Ibiza Portal (https://portal.azure.com).
And you must set the custom connector proxy’s permissions for accessing your web api. (You cannot set this permission and cannot see the resource id in the Ibiza portal today.)
See the following screenshot.
Note : Strictly speaking, v2.0 endpoint (Azure AD v2 endpoint) is supported in the custom api connector. But, this proxy and web api flow (see the illustration above) is not supported for v2.0 endpoint.
Please refer the next Google scenario (flow) for the v2.0 endpoint.

How to work (or use) in Power Apps
Now you’re ready to use the custom api connector in Power Automate and Power Apps. Here I show you the step of setting Power Apps.
Note : For the details of this procedure, please refer the official document “Register Custom Connectors in PowerApps“.
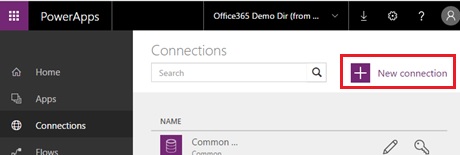
First you login to Power Apps (https://web.powerapps.com/), and select [Connections] in the navigation, and click [New connection].
Select [Custom] tab and click [New custom API].

In the next window, upload the swagger specification file (json) previously created.

The swagger specification is parsed and the identity provider is auto-detected by the Power Apps.
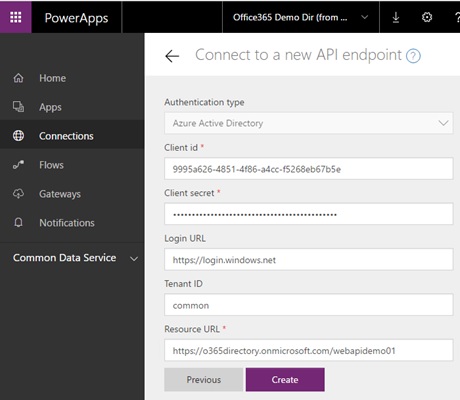
You must set some api information in the next window like the following screenshot. Note that this client id and secret is for the previous custom connector proxy, not your web api. The Resource URL (the accessing scopes) is the ID/URI of your web api, not the custom connector proxy.
The connection settings of the custom api connector has done. Next you start to create the app in the Power Apps.
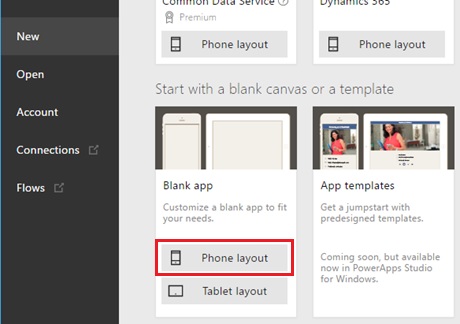
Click [New App] button, and select [Phone layout] in the [Blank app].
In the design window, select [Content] – [Data sources] menu.

The data source window is displayed in the right pane, and click [Add data source] button, and [New connection] button.
You can find the previously created custom api connector, and select (connect) that.

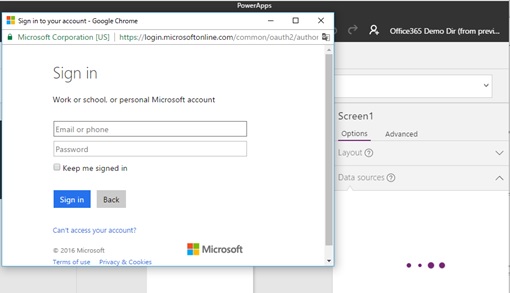
Then the Azure AD sign-in UI is displayed, and you must enter your credential.
The custom api connector is inserted as the data source.

Let’s test this custom connector !
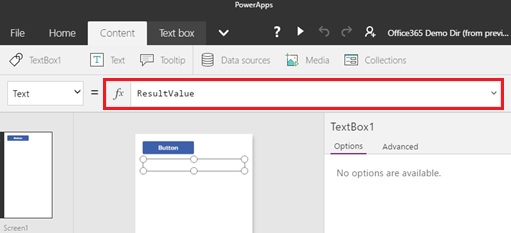
Please insert the button control into your app, and input the following expression as the button “OnSelect” function (fx).
This is calling the “ValuesGet” method (see the previous “operationId” in the swagger file) in the custom connector named “TestApi01”, and setting the string result in the context variable named “ResultValue”.
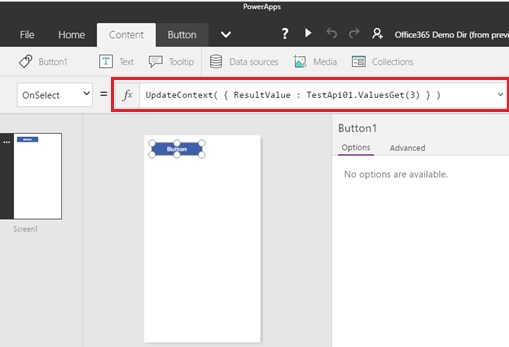
UpdateContext( { ResultValue : TestApi01.ValuesGet(3) } )Note : You can use auto-correct or suggestions when you’re writing functions.
Next you insert the text box, and set “ResultValue” (the context variable previously created) in the text box function.
Push run button, and this app is launched in the web browser.
When you push the button in the app, your web api is called by the Power Apps and the returned value is displayed in the text box.

In the backend, the following http request is called against your web api.
Then your web api can verify the token (the following “Authorization” header value) and retrieve the claims, as I described before in the post “How to build API secured by Azure AD” (Japanese).
GET /api/Values/3
Accept: */*
Authorization: Bearer eyJ0eXAiOi...
Origin: https://us.create.powerapps.com
X-Ms-Apim-Tokens: ew0KICAidG...
HTTP/1.1 200 OK
Content-Type: application/json; charset=utf-8
"you entered 3"Note : The “X-Ms-Apim-Tokens” header is also important, and I explain this later. (In the case of Azure AD, there’s no need to use this token.)
This token (“Authorization” header value) is the Azure AD access token iteself. Then you can also get the access token for anothor resources in your web api by calling the following OAuth on_behalf_of flow.
That is, your web api can collaborate another Azure AD resources like Office 365 API, Azure ARM REST, Power BI REST, etc.
POST https://login.microsoftonline.com/common/oauth2/token
Content-Type: application/x-www-form-urlencoded
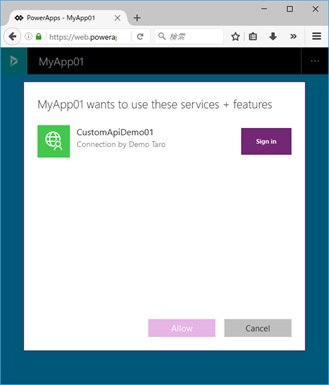
grant_type=urn%3Aietf%3Aparams%3Aoauth%3Agrant-type%3Ajwt-bearer&assertion={received access token}&requested_token_use=on_behalf_of&resource={resource id that your api wants to access}&scope=openid&client_id={client id of your web api}&client_secret={client secret of your web api}You can share your app to other people in the same organization.
The sign-in for this custom connector, i.e, Azure AD sign-in is needed, when the user launch this app for the first time. (see the following screenshot)
Other Providers (Sample of Google Account)
You can also use the OAuth 2.0 of Google, Facebook, Salesforce and other SaaS applications including the generic OAuth 2.0 providers. (see the official document “Register Custom Connectors in Microsoft Flow“. The flow by API Key and Basic Authentication are also supported.)
Let’s see the case of Google account.
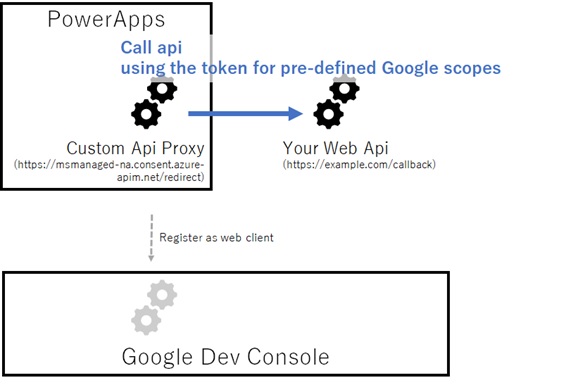
Google and most providers are not having api registration, only client registration. (Except for the app context like api key.)
Therefore, you register only the custom connector proxy as OAuth client into Google Developer Console, get access token for pre-defined Google scopes only (profile, email, etc), and pass this token to your web api. (Or you could use the api key instead.)
Next is the swagger example for Google account settings. (see the bold font)
{
  "swagger": "2.0",
  "info": {
    "version": "v1",
    "title": "TestApi01"
  },
  "host": "demo.azurewebsites.net",
  "schemes": [
    "https"
  ],
  "paths": {
    "/api/Values/{id}": {
      "get": {
        "tags": [
          "Values"
        ],
        "operationId": "Values_Get",
        "consumes": [

        ],
        "produces": [
          "application/json",
          "text/json",
          "application/xml",
          "text/xml"
        ],
        "parameters": [
          {
            "name": "id",
            "in": "path",
            "required": true,
            "type": "integer",
            "format": "int32"
          }
        ],
        "responses": {
          "200": {
            "description": "OK",
            "schema": {
              "type": "string"
            }
          }
        }
      },
      . . .

    }
  },
  "definitions": {
  },
  "securityDefinitions": {
    "oauth2": {
      "type": "oauth2",
      "flow": "accessCode",
      "authorizationUrl": "https://accounts.google.com/o/oauth2/auth",
      "tokenUrl": "https://www.googleapis.com/oauth2/v4/token",
      "scopes": {

      }
    }
  }
}
Power Apps (or Power Automate) automatically detects Google account, and when you connect to the custom connector, the Google account login is displayed as the following screenshot.


Next is the http request for your web api.
It is the same like Azure AD, but not. The “Authorization” header value is the access token for Google scopes, not for your web api.
GET /api/Values/3
Accept: */*
Authorization: Bearer ya29.Ci-aAy...
Origin: https://us.create.powerapps.com
X-Ms-Apim-Tokens: ew0KICAidG...
Therefore you cannot verify this access token in your web api, but you can verify the login user instead of using X-Ms-Apim-Tokens. This token (X-Ms-Apim-Tokens) is the Base64 Url encoded value (see RFC 4648) of the following json string, and as you can see, the value includes the refresh token and id token of Google account. As a result, you can decode the id token value, and retrieve the user claims, verify the digital signature.
{
  "token": {
    "AccessToken": "ya29.Ci-aAy...",
    "ExpiresIn": "3600",
    "IdToken": "eyJhbGciOi...",
    "RefreshToken": "1/udVjULwb...",
    "TokenType": "Bearer",
    "OAuth2TokenEndPointCredentialLocation": "Body",
    "ExpiresOn": "636150505441694110",
    "LoginSettingId": "msmanaged-na_customapidemo02.5f989...",
    "TokenAcquireTime": "11/18/2016 6:22:24 AM"
  },
  "sku": "Enterprise",
  "$connectionCreator": {
    "objectId": "cf258756-2623-47cb-be46-c85d436265bb",
    "tenantId": "3c839350-a414-442a-9585-8db0b0f5f300",
    "userPrincipalName": "tsmatsuz@o365directory.onmicrosoft.com"
  },
  "$ConnectionKey": "Key eyJ0eXAiOi...",
  "$callerIdentity": {
    "objectid": "cf258756-2623-47cb-be46-c85d436265bb",
    "prinicipaltype": "ActiveDirectory",
    "tenantid": "3c839350-a414-442a-9585-8db0b0f5f300",
    "email": "tsmatsuz@o365directory.onmicrosoft.com"
  }
}
If your web api doesn’t need the login user, you could use the api key instead.
Change logs :
2017/05 renamed “custom api” to “custom connector”
Categories: Uncategorized

thanks for your useful post dear Tsuyoshi Matsuzaki !
i always have problem with web apis.
LikeLike
is it necessary to have Azure subscription. Cann’t we publish our wepApi to any public Server and use it in power App.
LikeLike
You can host the custom api to any public server. (Of course, if you’re using api app or easy auth, it needs to be hosted in Azure.)
For example, you can also host in ngrok endpoint, and you can check the traffic.
LikeLike
Is it still necessary to use the old Azure portal? I see screen dumps in the PowerApps documentation uses it.
Just wondering because I’m unable to get it to work using the documentation…
LikeLike
The reason for using old portal (Classic portal) is now only because you cannot get the “app id uri” (so called, resource id) of your custom web api. (If you register the api in new portal, the app uri named “https://{your tenant domain prefix}.onmicrosoft.com/{unique guid}” is internally assigned, but you cannot know this uri in the new portal.) If you can get this uri, you can do all the task using the new portal without any pain.
As you know, the new portal is getting better quickly, and I think you will soon be able to complete all the tasks using the new portal without any frustration in the near future.
LikeLike
Can you use the Azure AD Token returned to Authenticate against SharePoint?
LikeLike
No, you cannot use. This Azure AD token (JWT) is including the target resource, which is your web api in this case.
LikeLike
You mentioned that “The custom connector (API connector) enables you to connect your own web api (REST api) in Microsoft Flow (including SharePoint workflow) “.
Can you share some details on how to use this connector in SharePoint workflow?
LikeLike
I’m sorry, if my mention is confusing you like “custom connector can be also used in original ‘SharePoint workflow’ (not ‘Microsoft Flow’) “. My mention is saying that “Microsoft Flow is now integrated with SharePoint Online and therefore you can use your connector as workflow in SharePoint Online”. Custom connector can be used in logic app or Microsoft Flow, but you cannot use in original ‘SharePoint workflow’. (Sorry for my poor English explanation.)
For instance, if you want to connect to some services or apps and the protocol is not supported in built-in connectors, you can build and connect using your custom connector and use it in Microsoft Flow integrated with SharePoint Online. (Though Microsoft Flow is rapidly improving and you can now do more and more things using built-in connectors in Microsoft Flow…) By building your custom connector, you can also create reusable components and share in your organization.
https://docs.microsoft.com/en-us/connectors/custom-connectors/share
LikeLike