Azure AD B2C has much flexibility for a variety of customizations with standard user flows, but sometimes, custom policy (handcrafting policy editing for XML definitions) is required, when you need more advanced and detailed configurations.
As you can see in GitHub sample policies (see “Custom CIAM User Journeys“), you can achieve a variety of the following scenarios by custom policies. (These are just a part of sample scenarios that you can create.)
- Additional verification steps, such as, one-time passcode, captcha, or other fine-grained verifications (for instance, “only users belonging some specific groups can log-in”)
- Support an external identity provider, which is not included in built-in providers (such as, Salesforce, ADFS, LINE, …)
- Password-less sign-in with e-mail, phone, FIDO, or others
- Advanced multi-factor authentication enhancements
For the folks who try to edit policies by oneself, here we walkthrough the policy structure in Azure AD B2C custom policy on Identity Experience Framework (IEF).
By learning this walkthrough, I hope you’ll have a intuitive sense of “where is” or “what is” for each settings in B2C custom policy.
I note that this post assumes that you have basic knowledge for Azure AD B2C (such as, user flows with standard UI, simple UX customization for branding, …) and general identity technologies, such as, OpenID or OAuth.
Starter Pack Samples and Policy Outline
If you’re new to creating custom policies, please download and apply samples in custom policy starter pack (go to here) at first.
Note : Before you apply sample policies in starter pack, please configure required settings, such as, registering key/secret, registering applications, and so on. See official document “Get started with custom policies in Azure Active Directory B2C“.
For instance, in {starter pack dir}/SocialAndLocalAccounts folder, there exists basic custom policy, with which there’re just Facebook and local account’s providers without any other special configurations. (See below.)
When you need your own custom policy in your business, you can reuse these start-pack samples and it’s not needed to manually setup from scratch.

Now let’s see this basic configurations in starter pack.
First, you should know that each policy can inherit (and overwrite) an existing (installed) policy with the following <BasePolicy/> element.
In the example below, this policy B2C_1A_TrustFrameworkExtensions inherits the policy B2C_1A_TrustFrameworkBase.
Policy Inheritance
<?xml version="1.0" encoding="utf-8" ?>
<TrustFrameworkPolicy PolicyId="B2C_1A_TrustFrameworkExtensions" ...>

  <BasePolicy>
    <TenantId>yourtenant.onmicrosoft.com</TenantId>
    <PolicyId>B2C_1A_TrustFrameworkBase</PolicyId>
  </BasePolicy>

  ...

</TrustFrameworkPolicy>
In SocialAndLocalAccounts folder, you will find 5 files, such as, TrustFrameworkBase.xml, TrustFrameworkExtensions.xml, and other 3 files. In these policy structure, the core configuration is built in TrustFrameworkBase.xml file, and the additional application-specific settings (such as, client id, scope, required claims) are written in TrustFrameworkExtensions.xml by inheriting TrustFrameworkBase.xml. Other 3 files (SignUpOrSignin.xml, ProfileEdit.xml, PasswordReset.xml) describes respective relying party setting by inheriting TrustFrameworkExtensions.xml.
Thus, when you apply these policies with wrong orders, you will encounter the errors.
With a bird’s-eye view, the policy has the following outline.
Policy Outline
<TrustFrameworkPolicy ...>
  <BuildingBlocks>
    <ClaimsSchema ... />
    <ClaimsTransformations ... />
    <ClientDefinitions ... />
    <ContentDefinitions ... />
  </BuildingBlocks>
  <ClaimsProviders ... />
  <UserJourneys ... />
  <RelyingParty ... />
</TrustFrameworkPolicy>
Note : For simplicity, I’ll skip descriptions about
DisplayControls,Predicates,PredicateValidations, andLocalizationelements inBuildingBlocksin this post. See official document for these optional elements.
Each element means :
- The scenario (such as, a sign-in scenario, a password-reset scenario, …) is defined as a single
UserJourney(user workflow) inUserJourneyscollection.
The user journey is essentially the experience the user goes through. - Each scenario (user journey) consists of multiple behaviors, called technical profile. Then these technical profiles are defined in each
ClaimsProvider. For instance, local account’sClaimsProvidermight have a variety of technical profiles, such as, “requesting sign-in to user”, “providing self-assertion”, so on and so forth. - A single technical profile uses customized UI, claims, and other components in it. These components are all defined in
BuildingBlockscollection. - The application can invoke
UserJourneythrough aRelyingParty. For instance, when you make the user sign-in, you should define aRelyingPartywhich invokes the sign-inUserJourney. EachRelyingPartyhas a corresponding URL, such ashttps://{tenant}.b2clogin.com/{tenant}.onmicrosoft.com/oauth2/v2.0/authorize?p={policy name}/..., then the application uses this URL to start a signing-in flow.
From here, I’ll describe what’s doing in each elements, and finally I’ll show you a trivial example of custom policy.
BuildingBlocks element
As I mentioned above, this element includes various building components for technical profiles.
Each components are divided by child elements corresponding to the types of components as follows.
<BuildingBlocks>
  <ClaimsSchema ... />
  <ClaimsTransformations ... />
  <ClientDefinitions ... />
  <ContentDefinitions ... />
</BuildingBlocks>
1. ClaimsSchema
(See here for official reference.)
ClaimsSchema includes all claims used in policy, such as, tenant id, user id, user name, e-mail, so on and so forth. Each claim is defined as a ClaimType child’s element as follows.
<TrustFrameworkPolicy ...>
  <BuildingBlocks>
    <ClaimsSchema>
      <ClaimType Id="client_id">
        <DisplayName>client_id</DisplayName>
        <DataType>string</DataType>
        <AdminHelpText>Special parameter passed to EvoSTS.</AdminHelpText>
        <UserHelpText>Special parameter passed to EvoSTS.</UserHelpText>
      </ClaimType>
      <ClaimType Id="scope">
        <DisplayName>scope</DisplayName>
        <DataType>string</DataType>
        <UserHelpText>Special parameter passed for ...</UserHelpText>
      </ClaimType>
      <ClaimType Id="grant_type">
        <DisplayName>grant_type</DisplayName>
        <DataType>string</DataType>
        <UserHelpText>...</UserHelpText>
      </ClaimType>
      ... many many claims

    </ClaimsSchema>
    <ClaimsTransformations ... />
    <ClientDefinitions ... />
    <ContentDefinitions ... />
    <DisplayControls ... />
  </BuildingBlocks>
  <ClaimsProviders ... />
  <UserJourneys ... />
  <RelyingParty ... />
</TrustFrameworkPolicy>
Some claim’s value will be extracted from external providers, however, the name of claim will differ from each protocols. For instance, object Id will be often referred as oid in OIDC/OAuth, but http://schemas.microsoft.com/identity/claims/objectidentifier in SAML.
In such a case, you can define ClaimType with corresponding claim names as follows.
<ClaimType Id="objectId">
  <DisplayName>User's Object ID</DisplayName>
  <DataType>string</DataType>
  <DefaultPartnerClaimTypes>
    <Protocol Name="OAuth2" PartnerClaimType="oid" />
    <Protocol Name="OpenIdConnect" PartnerClaimType="oid" />
    <Protocol Name="SAML2" PartnerClaimType="http://schemas.microsoft.com/identity/claims/objectidentifier" />
  </DefaultPartnerClaimTypes>
  <UserHelpText>Object identifier (ID) of the user object in Azure AD.</UserHelpText>
</ClaimType>

<ClaimType Id="tenantId">
  <DisplayName>User's Object's Tenant ID</DisplayName>
  <DataType>string</DataType>
  <DefaultPartnerClaimTypes>
    <Protocol Name="OAuth2" PartnerClaimType="tid" />
    <Protocol Name="OpenIdConnect" PartnerClaimType="tid" />
    <Protocol Name="SAML2" PartnerClaimType="http://schemas.microsoft.com/identity/claims/tenantid" />
  </DefaultPartnerClaimTypes>
  <UserHelpText>Tenant identifier (ID) of the user object in Azure AD.</UserHelpText>
</ClaimType>
When the claim name differs from each identity providers in the same protocol, you can specify the origin name with PartnerClaimType in each technical profiles.
For instance, displayName claim is referred as name in Facebook, but referred as screen_name in Twitter. In this case, you can define as follows in technical profile settings.
(Later I’ll explain the configuration about technical profiles.)
<ClaimsProvider>
  <Domain>facebook.com</Domain>
  <DisplayName>Facebook</DisplayName>
  <TechnicalProfiles>
    <TechnicalProfile Id="Facebook-OAUTH">
      ...
      <OutputClaims>
        <OutputClaim ClaimTypeReferenceId="displayName" PartnerClaimType="name" />
        ...
      </OutputClaims>
      ...
    </TechnicalProfile>
  </TechnicalProfiles>
</ClaimsProvider>

<ClaimsProvider>
  <Domain>twitter.com</Domain>
  <TechnicalProfiles>
    <TechnicalProfile Id="Twitter-OAUTH">
      ...
      <OutputClaims>
        <OutputClaim ClaimTypeReferenceId="displayName" PartnerClaimType="screen_name" />
        ...
      </OutputClaims>
      ...
    </TechnicalProfile>
  </TechnicalProfiles>
</ClaimsProvider>
Not only provider’s claims, but also you can use the application-specific claims.
For instance, if you want to distinguish whether it’s logged-in by Twitter or not in custom policy, you can define the following flag (authenticationProvider) as a claim, and set the appropriate value to this claim in extracting.
In UserJourney, you can use this flag for building a logic.
<TrustFrameworkPolicy ...>
  <BuildingBlocks>
    <ClaimsSchema>
      <!-- Define "AuthenticationProvider" claim -->
      <ClaimType Id="authenticationProvider">
        <DisplayName>AuthenticationProvider</DisplayName>
        <DataType>string</DataType>
        <UserHelpText>Specifies authenticated IDP name</UserHelpText>
      </ClaimType>
      ...

    </ClaimsSchema>
    ...

  </BuildingBlocks>
  <ClaimsProviders>
    <ClaimsProvider>
      <Domain>twitter.com</Domain>
      <TechnicalProfiles>
        <TechnicalProfile Id="Twitter-OAUTH">
          ...
          <OutputClaims>
            <!-- Set "twitter" in this claim, when logged-in with Twitter -->
            <OutputClaim ClaimTypeReferenceId="authenticationProvider" DefaultValue="twitter" AlwaysUseDefaultValue="true" />
            ...
          </OutputClaims>
          ...
        </TechnicalProfile>
      </TechnicalProfiles>
    </ClaimsProvider>
    ...

  </ClaimsProviders>
  <UserJourneys ... />
  <RelyingParty ... />
</TrustFrameworkPolicy>
2. ClaimsTransformations
(See here for official reference.)
When you need primitive logic for claims, such as, string converter, formatting, condition checking, so on and so forth, you can use ClaimsTransformation and describe the rules of claim’s transformation that can be used in user journeys.
In ClaimsTransformations, you can use a variety of transformation methods as follows.
| Type | Supported Methods |
|---|---|
| General | CopyClaim, DoesClaimExist, Hash |
| String | AssertStringClaimsAreEqual, ChangeCase, CreateStringClaim, CompareClaims, CompareClaimToValue, CreateRandomString, FormatStringClaim, FormatStringMultipleClaims, GetLocalizedStringsTransformation, GetMappedValueFromLocalizedCollection, LookupValue, NullClaim, ParseDomain, SetClaimsIfRegexMatch, SetClaimsIfStringsAreEqual, SetClaimsIfStringsMatch, StringContains, StringSubstring, StringReplace, StringJoin, StringSplit |
| StringCollection | AddItemToStringCollection, AddParameterToStringCollection, GetSingleItemFromStringCollection, StringCollectionContains, StringCollectionContainsClaim |
| Boolean | AndClaims, AssertBooleanClaimIsEqualToValue, CompareBooleanClaimToValue, OrClaims |
| Integer | ConvertNumberToStringClaim |
| Date | AssertDateTimeIsGreaterThan, ConvertDateToDateTimeClaim, ConvertDateTimeToDateClaim, GetCurrentDateTime, DateTimeComparison |
| JSON | GenerateJson, GetClaimFromJson, GetClaimsFromJsonArray, GetNumericClaimFromJson, GetSingleItemFromJson, GetSingleValueFromJsonArray, XmlStringToJsonString |
| Phone number | ConvertPhoneNumberClaimToString, ConvertStringToPhoneNumberClaim, GetNationalNumberAndCountryCodeFromPhoneNumberString |
| External account | CreateAlternativeSecurityId, AddItemToAlternativeSecurityIdCollection, GetIdentityProvidersFromAlternativeSecurityIdCollectionTransformation, RemoveAlternativeSecurityIdByIdentityProvider |
For instance, when you check if user’s password matches a password on banned password list (such as “password”, “Password”, or “P@ssw0rd”), you can use the following LookupValue transformation method. If it matches one of InputParameters, the claim bannedPassword will be set to “true” (string) in this transformation.
After this transformation is executed, you can check whether bannedPassword claim is “true” or not using CompareClaims method in transformations.
(See “Sign up and Password reset with banned password list” sample in GitHub.)
<ClaimsTransformation Id="passwordToMatchBanList" TransformationMethod="LookupValue">
    <InputClaims>
        <InputClaim ClaimTypeReferenceId = "newPassword" TransformationClaimType="inputParameterId" />
    </InputClaims>
    <InputParameters>
        <InputParameter Id="password" DataType="string" Value="true" />
        <InputParameter Id="Password" DataType="string" Value="true" />
        <InputParameter Id="P@ssw0rd" DataType="string" Value="true" />
        <InputParameter Id="errorOnFailedLookup" DataType="boolean" Value="false" />
    </InputParameters>
    <OutputClaims>
        <OutputClaim ClaimTypeReferenceId = "bannedPassword" TransformationClaimType="outputClaim" />
    </OutputClaims>
</ClaimsTransformation>
In a technical profile, you can call this transformation as follow.
(Later I’ll explain details about technical profiles.)
<TechnicalProfile Id="PasswordCheckTest">
  <DisplayName>Password Check</DisplayName>
  <Protocol Name="Proprietary" Handler="Web.TPEngine.Providers.ClaimsTransformationProtocolProvider, Web.TPEngine, Version=1.0.0.0, Culture=neutral, PublicKeyToken=null" />
  ...

  <OutputClaimsTransformations>
    <!-- Check whether it's one of banned passowrds and set "bannedPassword" -->
    <OutputClaimsTransformation ReferenceId="passwordToMatchBanList" />
    ... (Next, check whether "bannedPassword" is "true" or not)

  </OutputClaimsTransformations>
</TechnicalProfile>
3. ClientDefinitions
This element specifies the client (end-user device). Ordinally, a single ClientDefinition (for web client) is used in ClientDefinitions collection as follows.
<ClientDefinitions>
  <ClientDefinition Id="DefaultWeb">
    <ClientUIFilterFlags>LineMarkers, MetaRefresh</ClientUIFilterFlags>
  </ClientDefinition>
</ClientDefinitions>
This is referred in each user journeys as follows.
(Later I’ll explain UserJourneys.)
<UserJourney Id="SignUpOrSignIn">
  <OrchestrationSteps>
    <OrchestrationStep Order="1" ...>
      ...
    </OrchestrationStep>
    <OrchestrationStep Order="2" ...>
      ...
    </OrchestrationStep>
    <OrchestrationStep Order="3" ...>
      ...
    </OrchestrationStep>
    ...
  </OrchestrationSteps>
  <ClientDefinition ReferenceId="DefaultWeb" />
</UserJourney>
4. ContentDefinitions
(See here for official reference.)
All user-interfaces (i.e, pages) used in technical profiles should be defined as each ContentDefinition.
The user-interfaces in Azure AD B2C (such as, sign-in/sign-up, identity selector, profile update, …) have corresponding content definition IDs. When you want to define ContentDefinition for this UI, specify this ID in Id attribute.
When you use default html template (default UI) in B2C without any customization, specify default tempalte URI for LoadUri as follows.
Note : See here for all content IDs and default html URIs.
<ContentDefinitions>
  <ContentDefinition Id="api.signuporsignin">
    <LoadUri>~/tenant/templates/AzureBlue/unified.cshtml</LoadUri>
    <RecoveryUri>~/common/default_page_error.html</RecoveryUri>
    <DataUri>urn:com:microsoft:aad:b2c:elements:unifiedssp:1.0.0</DataUri>
    <Metadata>
      <Item Key="DisplayName">Signin and Signup</Item>
    </Metadata>
  </ContentDefinition>
  <ContentDefinition Id="api.idpselections">
    <LoadUri>~/tenant/templates/AzureBlue/idpSelector.cshtml</LoadUri>
    <RecoveryUri>~/common/default_page_error.html</RecoveryUri>
    <DataUri>urn:com:microsoft:aad:b2c:elements:idpselection:1.0.0</DataUri>
    <Metadata>
      <Item Key="DisplayName">Idp selection page</Item>
      <Item Key="language.intro">Sign in</Item>
    </Metadata>
  </ContentDefinition>
  ...

</ContentDefinitions>
When you customize a page for some content ID, specify URL of your customized page for LoadUri entity as follows.
<ContentDefinition Id="api.selfasserted">
  <LoadUri>https://xxxxx.azurewebsites.net/b2c-test.html</LoadUri>
  <RecoveryUri>~/common/default_page_error.html</RecoveryUri>
  <DataUri>urn:com:microsoft:aad:b2c:elements:selfasserted:1.1.0</DataUri>
  <Metadata>
    <Item Key="DisplayName">Collect information from user page</Item>
  </Metadata>
</ContentDefinition>
In customized HTML page, you just insert <div id="api"></div> to show the required elements. Then you are free to decorate with custom styles or custom contents in your HTML page. (You can also include JavaScript custom code.)
For details about B2C UI customization, see “Customize the user interface in Azure Active Directory B2C” in official document.
<!DOCTYPE html>
<html>
  <head>
    <title>Test</title>
  </head>
  <body>
    <div id="hell-test" style="font-size:large;">Hello B2C</div>
    <div id="api"></div>
  </body>
</html>
ClaimsProviders element
(See here for official reference.)
As I mentioned above, ClaimsProvider includes all behaviors for user journeys, called a technical profile (TechnicalProfile element). Every claim providers must have one or more technical profiles.
Not only identity providers (both external account and local account), but also all the required behaviors should be included as TechnicalProfile (and its ClaimsProvider).
In this section, we’ll see many of frequently used ClaimsProvider and TechnicalProfile by categorizing these objects.
1. Mandatory Provider (Trust Framework Policy Engine Provider)
Fist of all, I’ll show you a trust framework policy engine provider.
This is a mandatory provider for all custom policies, then anyway you should include the following ClaimsProvider element in ClaimsProviders.
<ClaimsProvider>
  <DisplayName>Trustframework Policy Engine TechnicalProfiles</DisplayName>
  <TechnicalProfiles>
    <TechnicalProfile Id="TpEngine_c3bd4fe2-1775-4013-b91d-35f16d377d13">
      <DisplayName>Trustframework Policy Engine Default Technical Profile</DisplayName>
      <Protocol Name="None" />
      <Metadata>
        <Item Key="url">{service:te}</Item>
      </Metadata>
    </TechnicalProfile>
  </TechnicalProfiles>
</ClaimsProvider>
2. External Provider
Next, let’s see more comprehensive providers, external providers.
When you use external identity providers (such as, Facebook, Twitter, Goggle, so on and so forth) in custom policy, please describe how to authenticate in this provider with protocol setting (OAuth, OpenID Connect, SAML, …), endpoint url, request’s attributes (such as, client id, scope, grant type, …) and other related properties.
Let’s see the case of Facebook, which uses OAuth 2.0 (RFC 6749).
In Facebook, the app will authenticate with the following flow. (Here I assume you have basic knowledge about OAuth flow.)
step1 : go to authorization endpoint and show sign-in UI (Facebook)
GET https://www.facebook.com/dialog/oauth?client_id=2694572064107190&redirect_uri=https%3A%2F%2Fxxxxx.b2clogin.com%2Fxxxxx.onmicrosoft.com%2Foauth2%2Fauthresp&response_type=code&scope=email+public_profile&state=...
step2 : redirected to your site with authorization code, after logging-in (Facebook)
GET https://xxxxx.b2clogin.com/xxxxx.onmicrosoft.com/oauth2/authresp?code=AQAXZHF1bK...step3 : request access token using previous code (Facebook)
POST https://graph.facebook.com/oauth/access_token
Content-Type: application/x-www-form-urlencoded

grant_type=authorization_code
&code=AQAXZHF1bK...
&client_id=0000000000000000
&client_secret=14dd677c2d...
&scope=email+public_profile
&redirect_uri=https%3A%2F%2Fxxxxx.b2clogin.com%2Fxxxxx.onmicrosoft.com%2Foauth2%2Fauthresp
HTTP/1.1 200 OK
Content-Type: application/json; charset=UTF-8
facebook-api-version: v3.0
{
"access_token":"EAAmSsvKz6...",
"token_type":"bearer",
"expires_in":5183967
}step4 : get claims using previous access token (Facebook)
GET https://graph.facebook.com/me?fields=id,first_name,last_name,name,email&access_token=EAAmSsvKz6...HTTP/1.1 200 OK
Content-Type: text/javascript; charset=UTF-8
facebook-api-version: v7.0
{
"id": "3084092101648447",
"first_name": "Tsuyoshi",
"last_name": "Matsuzaki",
"name": "Tsuyoshi Matsuzaki",
"email": "tsmatz\u0040outlook.com"
}Note : Please disable
appsecret_proofand switch your app mode from “Development” to “Live” in Facebook app settings.

With a technical profile in B2C, you will be able to write this OAuth 2.0 flow as follows. (When this technical profile doesn’t work correctly, please trace the previous flow again.)
Facebook claims provider (OAuth2)
<ClaimsProvider>
  <Domain>facebook.com</Domain>
  <DisplayName>Facebook</DisplayName>
  <TechnicalProfiles>
    <TechnicalProfile Id="Facebook-OAUTH">
      <DisplayName>Facebook</DisplayName>
      <Protocol Name="OAuth2" />
      <Metadata>
        <Item Key="ProviderName">facebook</Item>
        <Item Key="authorization_endpoint">https://www.facebook.com/dialog/oauth</Item>
        <Item Key="AccessTokenEndpoint">https://graph.facebook.com/oauth/access_token</Item>
        <Item Key="ClaimsEndpoint">https://graph.facebook.com/me?fields=id,first_name,last_name,name,email</Item>
        <Item Key="HttpBinding">GET</Item>
        <Item Key="AccessTokenResponseFormat">json</Item>
        <Item Key="client_id">0000000000000000</Item>
        <Item Key="scope">email public_profile</Item>
        <Item Key="UsePolicyInRedirectUri">0</Item>
      </Metadata>
      <CryptographicKeys>
        <Key Id="client_secret" StorageReferenceId="B2C_1A_FacebookSecret" />
      </CryptographicKeys>
      <InputClaims />
      ...
    </TechnicalProfile>
  </TechnicalProfiles>
</ClaimsProvider>
Note : In order to provide secure information, such as, app key, app password, or app secret, you must register these values as policy keys (manual registration) using portal UI, and specify this key using
<CryptographicKeys />element as above. (Almost providers may need this kind of app key for federations.)
Here I show you several examples corresponding other protocols.
Twitter claims provider (OAuth1)
<ClaimsProvider>
  <Domain>twitter.com</Domain>
  <DisplayName>Twitter</DisplayName>
  <TechnicalProfiles>
    <TechnicalProfile Id="Twitter-OAUTH1">
      <DisplayName>Twitter</DisplayName>
      <Protocol Name="OAuth1" />
      <Metadata>
        <Item Key="ProviderName">Twitter</Item>
        <Item Key="authorization_endpoint">https://api.twitter.com/oauth/authenticate</Item>
        <Item Key="access_token_endpoint">https://api.twitter.com/oauth/access_token</Item>
        <Item Key="request_token_endpoint">https://api.twitter.com/oauth/request_token</Item>
        <Item Key="ClaimsEndpoint">https://api.twitter.com/1.1/account/verify_credentials.json?include_email=true</Item>
        <Item Key="ClaimsResponseFormat">json</Item>
        <Item Key="client_id">xxxxxxxxxx</Item>
      </Metadata>
      <CryptographicKeys>
        <Key Id="client_secret" StorageReferenceId="B2C_1A_TwitterSecret" />
      </CryptographicKeys>
      <InputClaims />
      ...
    </TechnicalProfile>
  </TechnicalProfiles>
</ClaimsProvider>
Microsoft Account (OpenID Connect)
<ClaimsProvider>
  <Domain>live.com</Domain>
  <DisplayName>Microsoft Account</DisplayName>
  <TechnicalProfiles>
    <TechnicalProfile Id="MSA-OIDC">
      <DisplayName>Microsoft Account</DisplayName>
      <Protocol Name="OpenIdConnect" />
      <Metadata>
        <Item Key="ProviderName">https://login.live.com</Item>
        <Item Key="METADATA">https://login.live.com/.well-known/openid-configuration</Item>
        <Item Key="response_types">code</Item>
        <Item Key="response_mode">form_post</Item>
        <Item Key="scope">openid profile email</Item>
        <Item Key="HttpBinding">POST</Item>
        <Item Key="UsePolicyInRedirectUri">0</Item>
        <Item Key="client_id">xxxxxxxxxx</Item>
      </Metadata>
      <CryptographicKeys>
        <Key Id="client_secret" StorageReferenceId="B2C_1A_MSASecret" />
      </CryptographicKeys>
      ...
    </TechnicalProfile>
  </TechnicalProfiles>
</ClaimsProvider>
Salesforce (SAML2)
<ClaimsProvider>
  <Domain>salesforce</Domain>
  <DisplayName>Salesforce</DisplayName>
  <TechnicalProfiles>
    <TechnicalProfile Id="salesforce">
      <DisplayName>Salesforce</DisplayName>
      <Description>Login with your Salesforce account</Description>
      <Protocol Name="SAML2"/>
      <Metadata>
        <Item Key="WantsEncryptedAssertions">false</Item>
        <Item Key="WantsSignedAssertions">false</Item>
        <Item Key="PartnerEntity">https://contoso-dev-ed.my.salesforce.com/.well-known/samlidp.xml</Item>
      </Metadata>
      <CryptographicKeys>
        <Key Id="SamlAssertionSigning" StorageReferenceId="B2C_1A_SAMLSigningCert"/>
        <Key Id="SamlMessageSigning" StorageReferenceId="B2C_1A_SAMLSigningCert"/>
      </CryptographicKeys>
      ...
    </TechnicalProfile>
  </TechnicalProfiles>
</ClaimsProvider>
Note : When you use Azure Active Directory as an external provider, you can use a claim provider with OpenID Connect protocol. (See here for details.)
The supported protocol (see <Protocol /> elements above) is “OAuth1“, “OAuth2“, “SAML2“, “OpenIdConnect“, “Proprietary“, and “None“.
The “Proprietary” protocol is not used for external providers, but used for calling .NET assembly in B2C. I’ll show you about this protocol in the next section for local account provider.
You can nest a technical profile (with IncludeTechnicalProfile) and then “None” protocol will be used in the nested provider. (Or, “None” is also used in built-in providers, such as, an engine provider as above.)
What if other (not-supported) protocols, such as, Basic auth or Form auth, is used in external providers ?
In this case, you can build your custom logic as REST API, and you can invoke this intermediate service (custom REST API) in your technical profile using the .NET assembly : Web.TPEngine.Providers.RestfulProvider, Web.TPEngine, Version=1.0.0.0, Culture=neutral, PublicKeyToken=null.
Later in this post, I’ll show you an example of how to use this Restful provider.
<TechnicalProfiles>
  <TechnicalProfile Id="REST-EmailVerification">
    <DisplayName>Validate user input data and return loyaltyNumber claim</DisplayName>
    <Protocol Name="Proprietary" Handler="Web.TPEngine.Providers.RestfulProvider, Web.TPEngine, Version=1.0.0.0, Culture=neutral, PublicKeyToken=null" />
    <Metadata>
      <Item Key="ServiceUrl">https://xxxxx.azurewebsites.net/test-identity</Item>
      <Item Key="AuthenticationType">None</Item>
      <Item Key="SendClaimsIn">Body</Item>
    </Metadata>
    <InputClaims>
      <InputClaim ClaimTypeReferenceId="email" />
      <InputClaim ClaimTypeReferenceId="verificationCode" PartnerClaimType="code" />
    </InputClaims>
    <UseTechnicalProfileForSessionManagement ReferenceId="SM-Noop" />
  </TechnicalProfile>
</TechnicalProfiles>
Note (Session Provider) : All technical profiles (except for mandatory profile and JWT issuer) should have one of session providers in a list here to retain session.
In this post, I don’t describe about session providers, but see custom policy samples in starter pack.
3. User Interaction’s Provider
When the user logs-in with external accounts (Facebook, Twitter, Salesforce, …) for the first time, B2C asks user to input the additional required properties (i.e, self-asserted attributes) as follows, and these properties will be stored in B2C directory.

These activities should also be defined as claim’s providers and its technical profiles. (See below.)

First, I’ll show you claim’s providers and technical profiles for self-asserted attributes (the above profiles filled with blue color).
The following is an example provider for self-asserted attributes. (Here I copied the definition from {starter pack}/SocialAndLocalAccounts/TrustFrameworkBase.xml.)
This technical profile shows a page for self-asserted attributes (content definition ID “api.selfasserted“) to the user and collects user’s attributes. This is done by B2C built-in .NET assembly : Web.TPEngine.Providers.SelfAssertedAttributeProvider, Web.TPEngine, Version=1.0.0.0, Culture=neutral, PublicKeyToken=null .
In order to invoke this bult-in .NET assembly, you should specify “Proprietary” for Protocol as follows.
<ClaimsProvider>
  <DisplayName>Self Asserted</DisplayName>
  <TechnicalProfiles>
    <TechnicalProfile Id="SelfAsserted-Social">
      <DisplayName>User ID signup</DisplayName>
      <Protocol Name="Proprietary" Handler="Web.TPEngine.Providers.SelfAssertedAttributeProvider, Web.TPEngine, Version=1.0.0.0, Culture=neutral, PublicKeyToken=null" />
      <Metadata>
        <Item Key="ContentDefinitionReferenceId">api.selfasserted</Item>
      </Metadata>
      <CryptographicKeys>
        <Key Id="issuer_secret" StorageReferenceId="B2C_1A_TokenSigningKeyContainer" />
      </CryptographicKeys>
      <InputClaims>
        <InputClaim ClaimTypeReferenceId="displayName" />
        <InputClaim ClaimTypeReferenceId="givenName" />
        <InputClaim ClaimTypeReferenceId="surname" />
      </InputClaims>
      <OutputClaims>
        <!-- These claims are not shown (See descriptions below) -->
        <OutputClaim ClaimTypeReferenceId="objectId" />
        <OutputClaim ClaimTypeReferenceId="newUser" />
        <OutputClaim ClaimTypeReferenceId="executed-SelfAsserted-Input" DefaultValue="true" />

        <!-- These claims are shown in UI, if it's not provided by IDP -->
        <OutputClaim ClaimTypeReferenceId="displayName" />
        <OutputClaim ClaimTypeReferenceId="givenName" />
        <OutputClaim ClaimTypeReferenceId="surname" />
      </OutputClaims>
      <ValidationTechnicalProfiles>
        <ValidationTechnicalProfile ReferenceId="AAD-UserWriteUsingAlternativeSecurityId" />
      </ValidationTechnicalProfiles>
    </TechnicalProfile>
  </TechnicalProfiles>
</ClaimsProvider>
If sign-in user does not exist in the directory, a technical profile AAD-UserWriteUsingAlternativeSecurityId (see <ValidationTechnicalProfiles /> above) creates a local account and returns objectId and newUser (which is the flag information for whether it’s new user or not).
Here I showed you a technical profile for only providing self-asserted attributes in external accounts, however, you should define other technical profiles for all user interactions, such as, sign-in, sign-up, password reset, or password change.
We’ll discuss these UI-centric profiles again in local account’s provider later.
4. Directory (Azure AD) Interaction’s Provider
Next, let’s see the directory side of technical profiles (the following profiles filled with orange color).
In Azure AD B2C, proven Azure Active Directory (Azure AD) is used as a backend directory. (All users and applications are stored on Azure AD directory in the tenant.)
Then all interactions (read / write operations) against a directory should be defined as an Azure AD claim provider.
For directory (Azure AD) interactions, you can use the built-in .NET assembly : Web.TPEngine.Providers.AzureActiveDirectoryProvider, Web.TPEngine, Version=1.0.0.0, Culture=neutral, PublicKeyToken=null .
Using <Metadata /> element, specify the type of operations (“Read” or “Write“) and other behavior’s properties to .NET assembly. For instance, by specifying false in RaiseErrorIfClaimsPrincipalAlreadyExists property in <Metadata /> element, the assembly doesn’t raise errors even when there already exists a user with same objectId in a write operation.
<ClaimsProvider>
  <DisplayName>Azure Active Directory</DisplayName>
  <TechnicalProfiles>

    <TechnicalProfile Id="AAD-Common">
      <DisplayName>Azure Active Directory</DisplayName>
      <Protocol Name="Proprietary" Handler="Web.TPEngine.Providers.AzureActiveDirectoryProvider, Web.TPEngine, Version=1.0.0.0, Culture=neutral, PublicKeyToken=null" />

      <CryptographicKeys>
        <Key Id="issuer_secret" StorageReferenceId="B2C_1A_TokenSigningKeyContainer" />
      </CryptographicKeys>

      <!-- To suppress SelfAsserted provider from invoking on validation profiles -->
      <IncludeInSso>false</IncludeInSso>
      <UseTechnicalProfileForSessionManagement ReferenceId="SM-Noop" />
    </TechnicalProfile>

    <TechnicalProfile Id="AAD-UserWriteUsingAlternativeSecurityId">
      <Metadata>
        <Item Key="Operation">Write</Item>
        <Item Key="RaiseErrorIfClaimsPrincipalAlreadyExists">true</Item>
        <Item Key="UserMessageIfClaimsPrincipalAlreadyExists">You are already registered.</Item>
      </Metadata>
      <IncludeInSso>false</IncludeInSso>
      <InputClaimsTransformations>
        <InputClaimsTransformation ReferenceId="CreateOtherMailsFromEmail" />
      </InputClaimsTransformations>
      <InputClaims>
        <InputClaim ClaimTypeReferenceId="AlternativeSecurityId" PartnerClaimType="alternativeSecurityId" Required="true" />
      </InputClaims>
      <PersistedClaims>
        <!-- Required claims -->
        <PersistedClaim ClaimTypeReferenceId="alternativeSecurityId" />
        <PersistedClaim ClaimTypeReferenceId="userPrincipalName" />
        <PersistedClaim ClaimTypeReferenceId="mailNickName" DefaultValue="unknown" />
        <PersistedClaim ClaimTypeReferenceId="displayName" DefaultValue="unknown" />
        <!-- Optional claims -->
        <PersistedClaim ClaimTypeReferenceId="otherMails" />
        <PersistedClaim ClaimTypeReferenceId="givenName" />
        <PersistedClaim ClaimTypeReferenceId="surname" />
      </PersistedClaims>
      <OutputClaims>
        <OutputClaim ClaimTypeReferenceId="objectId" />
        <OutputClaim ClaimTypeReferenceId="newUser" PartnerClaimType="newClaimsPrincipalCreated" />
        <!-- The following other mails claim is needed for the case when a user is created,
             we get otherMails from directory. Self-asserted provider also has an OutputClaims,
             and if this is absent, Self-Asserted provider will prompt the user for otherMails. -->
        <OutputClaim ClaimTypeReferenceId="otherMails" />
      </OutputClaims>
      <IncludeTechnicalProfile ReferenceId="AAD-Common" />
      <UseTechnicalProfileForSessionManagement ReferenceId="SM-AAD" />
    </TechnicalProfile>

    <TechnicalProfile Id="AAD-UserWriteProfileUsingObjectId">
      <Metadata>
        <Item Key="Operation">Write</Item>
        <Item Key="RaiseErrorIfClaimsPrincipalAlreadyExists">false</Item>
        <Item Key="RaiseErrorIfClaimsPrincipalDoesNotExist">true</Item>
      </Metadata>
      <IncludeInSso>false</IncludeInSso>
      <InputClaims>
        <InputClaim ClaimTypeReferenceId="objectId" Required="true" />
      </InputClaims>
      <PersistedClaims>
        <!-- Required claims -->
        <PersistedClaim ClaimTypeReferenceId="objectId" />
        <!-- Optional claims -->
        <PersistedClaim ClaimTypeReferenceId="givenName" />
        <PersistedClaim ClaimTypeReferenceId="surname" />
      </PersistedClaims>
      <IncludeTechnicalProfile ReferenceId="AAD-Common" />
    </TechnicalProfile>

    <TechnicalProfile Id="AAD-UserReadUsingAlternativeSecurityId">
      <Metadata>
        <Item Key="Operation">Read</Item>
        <Item Key="RaiseErrorIfClaimsPrincipalDoesNotExist">true</Item>
        <Item Key="UserMessageIfClaimsPrincipalDoesNotExist">User does not exist.</Item>
      </Metadata>
      <InputClaims>
        <InputClaim ClaimTypeReferenceId="AlternativeSecurityId" PartnerClaimType="alternativeSecurityId" Required="true" />
      </InputClaims>
      <OutputClaims>
        <!-- Required claims -->
        <OutputClaim ClaimTypeReferenceId="objectId" />

        <!-- Optional claims -->
        <OutputClaim ClaimTypeReferenceId="userPrincipalName" />
        <OutputClaim ClaimTypeReferenceId="displayName" />
        <OutputClaim ClaimTypeReferenceId="otherMails" />
        <OutputClaim ClaimTypeReferenceId="givenName" />
        <OutputClaim ClaimTypeReferenceId="surname" />
      </OutputClaims>
      <IncludeTechnicalProfile ReferenceId="AAD-Common" />
    </TechnicalProfile>

  </TechnicalProfiles>
</ClaimsProvider>
As you saw in previous “3. User Interaction’s Provider” section, a lot of technical profiles will invoke these Azure AD technical profiles as backend read/write operations into a directory.
5. Local Account’s Provider
Now we’re ready to build claim providers (including technical profiles) for local account. The idea is the same as examples in the case of external account which I have explained above.
Unlike an external account, the operations for sign-in and sign-up in local account should be provided with user-interaction’s providers.
For instance, the following is an example for the sign-in operation. This uses api.selfasserted (which is the same as one for the self-asserted attributes in external account) as a content definition for UI template.
<ClaimsProvider>
  <DisplayName>Local Account</DisplayName>
  <TechnicalProfiles>
    <TechnicalProfile Id="SelfAsserted-LocalAccountSignin-Email">
      <DisplayName>Local Account Signin</DisplayName>
      <Protocol Name="Proprietary" Handler="Web.TPEngine.Providers.SelfAssertedAttributeProvider, Web.TPEngine, Version=1.0.0.0, Culture=neutral, PublicKeyToken=null" />
      <Metadata>
        <Item Key="SignUpTarget">SignUpWithLogonEmailExchange</Item>
        <Item Key="setting.operatingMode">Email</Item>
        <Item Key="ContentDefinitionReferenceId">api.selfasserted</Item>
      </Metadata>
      <InputClaims>
        <InputClaim ClaimTypeReferenceId="signInName" />
      </InputClaims>
      <OutputClaims>
        <OutputClaim ClaimTypeReferenceId="signInName" Required="true" />
        <OutputClaim ClaimTypeReferenceId="password" Required="true" />
        <OutputClaim ClaimTypeReferenceId="objectId" />
        <OutputClaim ClaimTypeReferenceId="authenticationSource" />
      </OutputClaims>
      <ValidationTechnicalProfiles>
        <ValidationTechnicalProfile ReferenceId="login-NonInteractive" />
      </ValidationTechnicalProfiles>
    </TechnicalProfile>
  </TechnicalProfiles>
</ClaimsProvider>
After the user proceeds to login, a technical profile login-NonInteractive (see above) is invoked for validation.
As I mentioned above, Azure AD B2C uses Azure Active Directory (Azure AD) as a backend directory. For this reason, this technical profile (login-NonInteractive) will ask whether username (signInName) and password is valid for Azure Active Directory.
To accomplish this, ROPC grant flow (i.e, the flow with grant_type=password) is used for validation as follows.
<ClaimsProvider>
  <DisplayName>Local Account SignIn</DisplayName>
  <TechnicalProfiles>
    <TechnicalProfile Id="login-NonInteractive">
      <DisplayName>Local Account SignIn</DisplayName>
      <Protocol Name="OpenIdConnect" />
      <Metadata>
        <Item Key="UserMessageIfClaimsPrincipalDoesNotExist">We can't seem to find your account</Item>
        <Item Key="UserMessageIfInvalidPassword">Your password is incorrect</Item>
        <Item Key="UserMessageIfOldPasswordUsed">Looks like you used an old password</Item>
        <Item Key="ProviderName">https://sts.windows.net/</Item>
        <Item Key="METADATA">https://login.microsoftonline.com/{tenant}/.well-known/openid-configuration</Item>
        <Item Key="authorization_endpoint">https://login.microsoftonline.com/{tenant}/oauth2/token</Item>
        <Item Key="response_types">id_token</Item>
        <Item Key="response_mode">query</Item>
        <Item Key="scope">email openid</Item>
        <!-- Policy Engine Clients -->
        <Item Key="UsePolicyInRedirectUri">false</Item>
        <Item Key="HttpBinding">POST</Item>
      </Metadata>
      <InputClaims>
        <InputClaim ClaimTypeReferenceId="signInName" PartnerClaimType="username" Required="true" />
        <InputClaim ClaimTypeReferenceId="password" Required="true" />
        <InputClaim ClaimTypeReferenceId="grant_type" DefaultValue="password" />
        <InputClaim ClaimTypeReferenceId="scope" DefaultValue="openid" />
        <InputClaim ClaimTypeReferenceId="nca" PartnerClaimType="nca" DefaultValue="1" />
      </InputClaims>
      <OutputClaims>
        <OutputClaim ClaimTypeReferenceId="objectId" PartnerClaimType="oid" />
        <OutputClaim ClaimTypeReferenceId="tenantId" PartnerClaimType="tid" />
        <OutputClaim ClaimTypeReferenceId="givenName" PartnerClaimType="given_name" />
        <OutputClaim ClaimTypeReferenceId="surName" PartnerClaimType="family_name" />
        <OutputClaim ClaimTypeReferenceId="displayName" PartnerClaimType="name" />
        <OutputClaim ClaimTypeReferenceId="userPrincipalName" PartnerClaimType="upn" />
      </OutputClaims>
    </TechnicalProfile>
  </TechnicalProfiles>
</ClaimsProvider>
Note : As I mentioned in my old post (sorry, but it’s written in Japanese, since it was written a long time ago), ROPC grant flow is not recommended to be used in production for Azure AD authentication. However, in Azure AD B2C, this flow is used for only local account sign-in, in which the usage is so limited (there will not be MFA or AD federation in this scenario) and used only in the backend.
This flow (ROPC grant flow) is not supported in Azure AD v2 endpoint, then you should use v1 endpoint as above.
In local account, the other scenarios, such as, sign-up, password-change, and password-reset are also implemented in B2C claim’s providers with user-interactions and directory-interactions. As a result, you might have to define a lot of technical profiles for both UI and directory interactions for local account.
For simplicity, here I skip explanations for all these other technical profiles, but you can refer TrustFrameworkBase.xml in starter pack samples.
<ClaimsProvider>
  <DisplayName>Local Account</DisplayName>
  <TechnicalProfiles>
    <!-- For sign-in user-interaction -->
    <TechnicalProfile Id="SignIn-Sample">
      ...
    </TechnicalProfile>
    <!-- For sign-up user-interaction -->
    <TechnicalProfile Id="SignUp-Sample">
      ...
      <ValidationTechnicalProfiles>
        <ValidationTechnicalProfile ReferenceId="AAD-WriteUser" />
      </ValidationTechnicalProfiles>
    </TechnicalProfile>
    <!-- For password-change user-interaction -->
    <TechnicalProfile Id="ChangePassword-Sample">
      ...
      <ValidationTechnicalProfiles>
        <ValidationTechnicalProfile ReferenceId="AAD-WritePassword" />
      </ValidationTechnicalProfiles>
    </TechnicalProfile>
    ...
  </TechnicalProfiles>
</ClaimsProvider>
...

<ClaimsProvider>
  <DisplayName>Azure Active Directory</DisplayName>
  <TechnicalProfiles>
    <!-- For writing a user into a directory -->
    <TechnicalProfile Id="AAD-WriteUser">
      ...
    </TechnicalProfile>
    <!-- For changing password into a directory -->
    <TechnicalProfile Id="AAD-WritePassword">
      ...
    </TechnicalProfile>
    ...
  </TechnicalProfiles>
</ClaimsProvider>
6. JWT Issuer Provider
After the user has successfully logged-in, B2C should provide JWT (token) to the applications.
As I mentioned in my old post (see here for details), a given JWT (both id token and access token) provided by Azure AD consists of the following parts :
- JWT string has 3 tokens delimited by the dot (.) character.
- Each token (3 tokens) respectively means as follows :
- Information about certificate (e.g, the type of key, key id (X.509 Thumprint), and so on) :
These values doesn’t change for each authentication. (Fixed values) - Extracted claims (e.g, user principal, user name, scope, tenant id, token expiration, and so on) :
- A digital signature :
This is a byte code which is generated from previous token1 + token2 string and certificate (private key). Thus, if token string (either token1 or token2) is changed, this signature should also be modified. (This signature prevents from tampering.)
- Information about certificate (e.g, the type of key, key id (X.509 Thumprint), and so on) :
- Each delimited tokens are base64 URL encoded string (encoded by RFC 4686) as follows.

A claim provider (and technical profile) for JWT issuer generates a token of this format.
This JWT issuer should be defined by the following claim provider (and technical profile).
<ClaimsProvider>
  <DisplayName>Token Issuer</DisplayName>
  <TechnicalProfiles>
    <TechnicalProfile Id="JwtIssuer">
      <DisplayName>JWT Issuer</DisplayName>
      <Protocol Name="None" />
      <OutputTokenFormat>JWT</OutputTokenFormat>
      <Metadata>
        <Item Key="client_id">{service:te}</Item>
        <Item Key="issuer_refresh_token_user_identity_claim_type">objectId</Item>
        <Item Key="SendTokenResponseBodyWithJsonNumbers">true</Item>
      </Metadata>
      <CryptographicKeys>
        <Key Id="issuer_secret" StorageReferenceId="B2C_1A_TokenSigningKeyContainer" />
        <Key Id="issuer_refresh_token_key" StorageReferenceId="B2C_1A_TokenEncryptionKeyContainer" />
      </CryptographicKeys>
      <InputClaims />
      <OutputClaims />
    </TechnicalProfile>
  </TechnicalProfiles>
</ClaimsProvider>
As I mentioned above, the id token and access token (JWT) in Azure AD B2C has a digital signature that are signed by user-provisioned certificate. This certificate is registered as a policy key using portal UI.
Then you should specify this policy key in <CryptographicKeys /> element with Id="issuer_secret" as above.
Note : As I mentioned here, the common certificate (in which the public key can be publically shared by everyone) is used in the usual common endpoint in Azure Active Directory (
https://login.microsoftonline.com/common/). However, in Azure AD B2C, the common endpoint is not used. In B2C, only tenant-specific endpoint (https://{url}/{tenant}.onmicrosoft.com/) is used, then the user-provisioned certificate is required for token signature.
Furthermore, the returned refresh token for OAuth is encrypted in B2C. (The id token and access token are not encrypted though.) For this encryption, you should also create encryption key (certificate) as a policy key in portal UI and set a reference for this key in <CryptographicKeys /> element as above.
UserJourneys element
(See here for official reference.)
All building components in previous sections (such as, content definitions, technical profiles, …) are composed as user workflows in this UserJourneys element.
There might exist multiple flows, such as, sign-in, sign-up, password-change, and others. Each flow is defined as a single UserJourney.
Here I show you a simple user journey example for sign-in. (This is written in SocialAndLocalAccounts/TrustFrameworkBase.xml in startup pack samples.)
Let’s see this flow step-by-step here.
<UserJourney Id="SignUpOrSignIn">
  <OrchestrationSteps>
    <OrchestrationStep Order="1" Type="CombinedSignInAndSignUp" ContentDefinitionReferenceId="api.signuporsignin">
      <ClaimsProviderSelections>
        <ClaimsProviderSelection TargetClaimsExchangeId="FacebookExchange" />
        <ClaimsProviderSelection ValidationClaimsExchangeId="LocalAccountSigninEmailExchange" />
      </ClaimsProviderSelections>
      <ClaimsExchanges>
        <ClaimsExchange Id="LocalAccountSigninEmailExchange" TechnicalProfileReferenceId="SelfAsserted-LocalAccountSignin-Email" />
      </ClaimsExchanges>
    </OrchestrationStep>

    <OrchestrationStep Order="2" Type="ClaimsExchange">
      <Preconditions>
        <Precondition Type="ClaimsExist" ExecuteActionsIf="true">
          <Value>objectId</Value>
          <Action>SkipThisOrchestrationStep</Action>
        </Precondition>
      </Preconditions>
      <ClaimsExchanges>
        <ClaimsExchange Id="FacebookExchange" TechnicalProfileReferenceId="Facebook-OAUTH" />
        <ClaimsExchange Id="SignUpWithLogonEmailExchange" TechnicalProfileReferenceId="LocalAccountSignUpWithLogonEmail" />
      </ClaimsExchanges>
    </OrchestrationStep>

    <OrchestrationStep Order="3" Type="ClaimsExchange">
      <Preconditions>
        <Precondition Type="ClaimEquals" ExecuteActionsIf="true">
          <Value>authenticationSource</Value>
          <Value>localAccountAuthentication</Value>
          <Action>SkipThisOrchestrationStep</Action>
        </Precondition>
      </Preconditions>
      <ClaimsExchanges>
        <ClaimsExchange Id="AADUserReadUsingAlternativeSecurityId" TechnicalProfileReferenceId="AAD-UserReadUsingAlternativeSecurityId-NoError" />
      </ClaimsExchanges>
    </OrchestrationStep>

    <OrchestrationStep Order="4" Type="ClaimsExchange">
      <Preconditions>
        <Precondition Type="ClaimsExist" ExecuteActionsIf="true">
          <Value>objectId</Value>
          <Action>SkipThisOrchestrationStep</Action>
        </Precondition>
      </Preconditions>
      <ClaimsExchanges>
        <ClaimsExchange Id="SelfAsserted-Social" TechnicalProfileReferenceId="SelfAsserted-Social" />
      </ClaimsExchanges>
    </OrchestrationStep>

    <OrchestrationStep Order="5" Type="ClaimsExchange">
      <Preconditions>
        <Precondition Type="ClaimEquals" ExecuteActionsIf="true">
          <Value>authenticationSource</Value>
          <Value>socialIdpAuthentication</Value>
          <Action>SkipThisOrchestrationStep</Action>
        </Precondition>
      </Preconditions>
      <ClaimsExchanges>
        <ClaimsExchange Id="AADUserReadWithObjectId" TechnicalProfileReferenceId="AAD-UserReadUsingObjectId" />
      </ClaimsExchanges>
    </OrchestrationStep>

    <OrchestrationStep Order="6" Type="ClaimsExchange">
      <Preconditions>
        <Precondition Type="ClaimsExist" ExecuteActionsIf="true">
          <Value>objectId</Value>
          <Action>SkipThisOrchestrationStep</Action>
        </Precondition>
      </Preconditions>
      <ClaimsExchanges>
        <ClaimsExchange Id="AADUserWrite" TechnicalProfileReferenceId="AAD-UserWriteUsingAlternativeSecurityId" />
      </ClaimsExchanges>
    </OrchestrationStep>

    <OrchestrationStep Order="7" Type="SendClaims" CpimIssuerTechnicalProfileReferenceId="JwtIssuer" />

  </OrchestrationSteps>
  <ClientDefinition ReferenceId="DefaultWeb" />
</UserJourney>
First, by running step 1, the following sign-in UI will be shown for the user.
As you can see, this is a combined user-interface with local account’s sign-in and external provider’s selector.
<OrchestrationStep Order="1" Type="CombinedSignInAndSignUp" ContentDefinitionReferenceId="api.signuporsignin">
  <ClaimsProviderSelections>
    <ClaimsProviderSelection TargetClaimsExchangeId="FacebookExchange" />
    <ClaimsProviderSelection ValidationClaimsExchangeId="LocalAccountSigninEmailExchange" />
  </ClaimsProviderSelections>
  <ClaimsExchanges>
    <ClaimsExchange Id="LocalAccountSigninEmailExchange" TechnicalProfileReferenceId="SelfAsserted-LocalAccountSignin-Email" />
  </ClaimsExchanges>
</OrchestrationStep>
By the following <Precondition /> in step 2, if objectId is already assigned, this step will be skipped.
What does this mean ?
When the user has successfully logged-in with a local account in step 1, the objectId will be assigned. However, the user has selected “Facebook” provider, objectId is not assigned and this step (step 2) will be evaluated. (That is, when the user has selected “Facebook” provider, this step will be evaluated.)
When the user has selected “Facebook” provider in step 1, the claim exchange “FacebookExchange” is executed in the next step by TargetClaimsExchangeId="FacebookExchange" in step 1.
As a result, a technical profile named “Facebook-OAUTH” is executed, when the user selected “Facebook” in step 1. (This technical profile will redirect web browser to Facebook login by OAuth manner.)
<OrchestrationStep Order="2" Type="ClaimsExchange">
  <Preconditions>
    <Precondition Type="ClaimsExist" ExecuteActionsIf="true">
      <Value>objectId</Value>
      <Action>SkipThisOrchestrationStep</Action>
    </Precondition>
  </Preconditions>
  <ClaimsExchanges>
    <ClaimsExchange Id="FacebookExchange" TechnicalProfileReferenceId="Facebook-OAUTH" />
    <ClaimsExchange Id="SignUpWithLogonEmailExchange" TechnicalProfileReferenceId="LocalAccountSignUpWithLogonEmail" />
  </ClaimsExchanges>
</OrchestrationStep>
There exist another case in this step 2.
What if the user has clicked the link “sign up now” in step 1 ?
By the following definition in a technical profile SelfAsserted-LocalAccountSignin-Email (see TrustFrameworkBase.xml file in starter pack), the claim exchange SignUpWithLogonEmailExchange (in step 2) will be invoked, when the user has clicked sign-up link.
As a result, a technical profile LocalAccountSignUpWithLogonEmail will be executed, when the user has clicked “sign up now” link in step 1.
<TechnicalProfile Id="SelfAsserted-LocalAccountSignin-Email">
  <DisplayName>Local Account Signin</DisplayName>
  <Protocol Name="Proprietary" Handler="Web.TPEngine.Providers.SelfAssertedAttributeProvider, Web.TPEngine, Version=1.0.0.0, Culture=neutral, PublicKeyToken=null" />
  <Metadata>
    <Item Key="SignUpTarget">SignUpWithLogonEmailExchange</Item>
    <Item Key="setting.operatingMode">Email</Item>
    <Item Key="setting.forgotPasswordLinkLocation">None</Item>
    <Item Key="ContentDefinitionReferenceId">api.selfasserted</Item>
  </Metadata>
  ...
</TechnicalProfile>
Let’s go to step 3.
By the previous technical profiles for both local account authentication (SelfAsserted-LocalAccountSignin-Email) and Facebook authentication (Facebook-OAUTH), authenticationSource will be set to “localAccountAuthentication” (string) and “socialIdpAuthentication” (string) respectively. (See TrustFrameworkBase.xml file in starter pack for details.)
By the following <Precondition /> in step 3, if authenticationSource is equal to “localAccountAuthentication“, this step will be skipped. That is, if Facebook authentication is selected, this step (technical profile AAD-UserReadUsingAlternativeSecurityId-NoError) is executed.
Inside this technical profile AAD-UserReadUsingAlternativeSecurityId-NoError, corresponding objectId is retrieved from B2C directory (i.e, Azure AD) using the user’s sign-in name. Even when the corresponding user object is not extracted in a directory (i.e, there’s no corresponding user in a directory, since the user signs-in for the first time), there will occur no errors in this profile.
<OrchestrationStep Order="3" Type="ClaimsExchange">
  <Preconditions>
    <Precondition Type="ClaimEquals" ExecuteActionsIf="true">
      <Value>authenticationSource</Value>
      <Value>localAccountAuthentication</Value>
      <Action>SkipThisOrchestrationStep</Action>
    </Precondition>
  </Preconditions>
  <ClaimsExchanges>
    <ClaimsExchange Id="AADUserReadUsingAlternativeSecurityId" TechnicalProfileReferenceId="AAD-UserReadUsingAlternativeSecurityId-NoError" />
  </ClaimsExchanges>
</OrchestrationStep>
In step 4, if there doesn’t exist objectId (i.e, if Facebook authentication is selected for the first time), a technical profile SelfAsserted-Social is executed.
<OrchestrationStep Order="4" Type="ClaimsExchange">
  <Preconditions>
    <Precondition Type="ClaimsExist" ExecuteActionsIf="true">
      <Value>objectId</Value>
      <Action>SkipThisOrchestrationStep</Action>
    </Precondition>
  </Preconditions>
  <ClaimsExchanges>
    <ClaimsExchange Id="SelfAsserted-Social" TechnicalProfileReferenceId="SelfAsserted-Social" />
  </ClaimsExchanges>
</OrchestrationStep>
This profile (SelfAsserted-Social) shows UI for self-asserted attributes as follows.
After the user has set these attributes and continued, this profile will add a user object in a directory with these self-asserted attributes.

In step 5, if local account’s authentication is selected, the technical profile AAD-UserReadUsingObjectId is executed.
This technical profile will retrieve the user information from B2C directory (backend Azure AD).
<OrchestrationStep Order="5" Type="ClaimsExchange">
  <Preconditions>
    <Precondition Type="ClaimEquals" ExecuteActionsIf="true">
      <Value>authenticationSource</Value>
      <Value>socialIdpAuthentication</Value>
      <Action>SkipThisOrchestrationStep</Action>
    </Precondition>
  </Preconditions>
  <ClaimsExchanges>
    <ClaimsExchange Id="AADUserReadWithObjectId" TechnicalProfileReferenceId="AAD-UserReadUsingObjectId" />
  </ClaimsExchanges>
</OrchestrationStep>
The step 6 is optional.
If there’s no attributes to collect in external authentication, the previous SelfAsserted-Social profile will be skipped. As a result, the user object won’t be created in B2C directory.
In that case, this step 6 will make sure to create a user object in B2C directory.
<OrchestrationStep Order="6" Type="ClaimsExchange">
  <Preconditions>
    <Precondition Type="ClaimsExist" ExecuteActionsIf="true">
      <Value>objectId</Value>
      <Action>SkipThisOrchestrationStep</Action>
    </Precondition>
  </Preconditions>
  <ClaimsExchanges>
    <ClaimsExchange Id="AADUserWrite" TechnicalProfileReferenceId="AAD-UserWriteUsingAlternativeSecurityId" />
  </ClaimsExchanges>
</OrchestrationStep>
Finally in step 7, B2C will generate JWT for relying party applications.
<OrchestrationStep Order="7" Type="SendClaims" CpimIssuerTechnicalProfileReferenceId="JwtIssuer" />In TrustFrameworkBase.xml (starter pack), there exist several other scenarios, such as, local account’s sign-up, password-change, and so on.
Please refer these user journeys for your learning.
RelyingParty element
(See here for official reference.)
The RelyingParty element is for the relying party application (such as, web application, mobile application, and others). Note that this RelyingParty element doesn’t register your application itself (which can be registered on “Applications” menu in B2C portal UI), but registers only policies for these applications.
In this element, it specifies which user journey is used for this application. And it provides endpoint url for the relying party application.
For instance, your application can invoke a sign-in request by using the endpoint : https://{tenant name}.b2clogin.com/tfp/{tenant name}.onmicrosoft.com/{policy name}/oauth2/v2.0/authorize (the policy name is such like “B2C_1A_signup_signin“).
This element also includes a list of claims which are needed for the application.
<RelyingParty>
<DefaultUserJourney ReferenceId="SignUpOrSignIn" />
<TechnicalProfile Id="PolicyProfile">
  <DisplayName>PolicyProfile</DisplayName>
  <Protocol Name="OpenIdConnect" />
  <OutputClaims>
    <OutputClaim ClaimTypeReferenceId="displayName" />
    <OutputClaim ClaimTypeReferenceId="givenName" />
    <OutputClaim ClaimTypeReferenceId="surname" />
    <OutputClaim ClaimTypeReferenceId="email" />
    <OutputClaim ClaimTypeReferenceId="objectId" PartnerClaimType="sub"/>
    <OutputClaim ClaimTypeReferenceId="identityProvider" />
    <OutputClaim ClaimTypeReferenceId="tenantId" AlwaysUseDefaultValue="true" DefaultValue="{Policy:TenantObjectId}" />
  </OutputClaims>
  <SubjectNamingInfo ClaimType="sub" />
</TechnicalProfile>
</RelyingParty>
Note : Above
{Policy:TenantObjectId}is called a claim resolver. If you want to set environment-dependent variables (such as, tenant name, tenant object id) in policy, you can use claim resolvers. See “About claim resolvers in Azure Active Directory B2C custom policies” in official document.
A Brief Example of Customization
Let’s see a simple customization example.
In this example, I’ll add a custom one-time passcode for sign-in.
Note (Aug 2022) : Now you can enable one-time passcode (TOTP) as Azure AD B2C MFA option. (See here.)
This example is for the purpose of your understanding.
As you saw above, a lot of settings (such as, all claims, all technical profiles, …) are needed in the real custom policy, then we now start from a starter pack sample in {stater pack}/SocialAndLocalAccounts folder.
First, we add the following new claim type one-time-code-test in <ClaimsSchema />.
<BuildingBlocks>
  <ClaimsSchema>
    ...

    <ClaimType Id="one-time-code-test">
      <DisplayName>one-time-code-test</DisplayName>
      <DataType>string</DataType>
      <UserHelpText>This is one time code for test</UserHelpText>
      <UserInputType>TextBox</UserInputType>
    </ClaimType>
    ...
In {starter pack}/SocialAndLocalAccounts, a technical profile SelfAsserted-LocalAccountSignin-Email is used for local account’s sign-in.
Now I’ll add the following 2 custom settings in this existing technical profile.
First, by adding the following one-time-code-test claim for output claims, this claim will be shown in sign-in UI to be collected.
Second, as I mentioned above, login-NonInteractive (ROPC grant flow for Azure AD) is invoked for validating sign-in in this technical profile. In this example, we now add the following custom profile Check-OneTimeCode for sign-in validation. (Later I’ll implement this Check-OneTimeCode.)
Note that ValidationTechnicalProfiles are order-aware. That means, when I add Check-OneTimeCode after login-NonInteractive as follows, username and password is checked by login-NonInteractive at first. Then if username and password is valid, one-time code is checked by Check-OneTimeCode.
<TechnicalProfile Id="SelfAsserted-LocalAccountSignin-Email">
  <DisplayName>Local Account Signin</DisplayName>
  <Protocol Name="Proprietary" Handler="Web.TPEngine.Providers.SelfAssertedAttributeProvider, Web.TPEngine, Version=1.0.0.0, Culture=neutral, PublicKeyToken=null" />
  <Metadata>
    <Item Key="SignUpTarget">SignUpWithLogonEmailExchange</Item>
    <Item Key="setting.operatingMode">Email</Item>
    <Item Key="setting.forgotPasswordLinkLocation">None</Item>
    <Item Key="ContentDefinitionReferenceId">api.selfasserted</Item>
  </Metadata>
  <IncludeInSso>false</IncludeInSso>
  <InputClaims>
    <InputClaim ClaimTypeReferenceId="signInName" />
  </InputClaims>
  <OutputClaims>
    <OutputClaim ClaimTypeReferenceId="signInName" Required="true" />
    <OutputClaim ClaimTypeReferenceId="password" Required="true" />
    <OutputClaim ClaimTypeReferenceId="objectId" />
    <OutputClaim ClaimTypeReferenceId="authenticationSource" />
    <OutputClaim ClaimTypeReferenceId="one-time-code-test" /> <!-- added here -->
  </OutputClaims>
  <ValidationTechnicalProfiles>
    <ValidationTechnicalProfile ReferenceId="login-NonInteractive" />
    <ValidationTechnicalProfile ReferenceId="Check-OneTimeCode" />  <!-- added here -->
  </ValidationTechnicalProfiles>
  <UseTechnicalProfileForSessionManagement ReferenceId="SM-AAD" />
</TechnicalProfile>
Now I’ll create a new technical profile Check-OneTimeCode, which checks whether one-time code is valid or not.
As I mentioned above, we can use a built-in assembly for Restful provider (Web.TPEngine.Providers.RestfulProvider, Web.TPEngine, Version=1.0.0.0, Culture=neutral, PublicKeyToken=null) for this kind of custom logic.
By the following technical profile, HTTP request with an input claim (one-time-code-test) in HTTP body will be invoked into the endpoint https://xxxxx.azurewebsites.net/b2c-test.php.
<TechnicalProfile Id="Check-OneTimeCode">
  <DisplayName>Check OneTimeCode with External Custom REST</DisplayName>
  <Protocol Name="Proprietary" Handler="Web.TPEngine.Providers.RestfulProvider, Web.TPEngine, Version=1.0.0.0, Culture=neutral, PublicKeyToken=null" />
  <Metadata>
    <Item Key="ServiceUrl">https://xxxxx.azurewebsites.net/b2c-test.php</Item>
    <Item Key="AuthenticationType">None</Item>
    <Item Key="AllowInsecureAuthInProduction">true</Item>
    <Item Key="SendClaimsIn">Body</Item> <!-- incoming format -->
    <Item Key="ClaimsFormat">Body</Item> <!-- returning format -->
  </Metadata>
  <InputClaims>
    <InputClaim ClaimTypeReferenceId="one-time-code-test" DefaultValue="" />
  </InputClaims>
</TechnicalProfile>
This endpoint will receive the following HTTP POST request for B2C validation.
If the validation is passed, return HTTP OK (200). If not, return HTTP error status.
POST /home/index
Accept: application/json
Content-Type: application/json; charset=utf-8

{"one-time-code-test":"abc"}
For instance, by the following trivial example, only “hellob2c” (fixed string) is passed for one-time code validation. (Sorry, but this example is not “one-time”, but “always” same valid code.)
<?php
  $parm = json_decode(file_get_contents('php://input'), true);
  if($parm['one-time-code-test'] != 'hellob2c') {
    http_response_code(403);
    $err = array('message' => 'One time code is invalid');
    echo json_encode($err);
  }
Finally, we build a user journey and invoke this from a relying party.
In our example scenario, we assume that our policy performs the following actions.
- First, it shows IDP selector as follows.

- When the user has clicked “Local Account Signin”, the previously customized profile
SelfAsserted-LocalAccountSignin-Emailis executed.
As I mentioned above, this profile will show the following login UI with a custom one-time code textbox. (And it checks whether one-time code is valid or not, when the user pushes “Continue” button.)

- After the login has succeeded, JWT is returned into the application.
Our completed custom policy (including a user journey and relying party) would be as follows.
Note that this inherits TrustFrameworkExtensions.xml. (You can add this file into {starter pack}/SocialAndLocalAccounts for a new scenario.)
<?xml version="1.0" encoding="UTF-8" standalone="yes"?>
<TrustFrameworkPolicy
xmlns:xsi="http://www.w3.org/2001/XMLSchema-instance"
xmlns:xsd="http://www.w3.org/2001/XMLSchema"
xmlns="http://schemas.microsoft.com/online/cpim/schemas/2013/06"
PolicySchemaVersion="0.3.0.0"
TenantId="xxxxx.onmicrosoft.com"
PolicyId="B2C_1A_CustomTest01"
PublicPolicyUri="http://xxxxx.onmicrosoft.com/B2C_1A_CustomTest01">
<BasePolicy>
<TenantId>xxxxx.onmicrosoft.com</TenantId>
<PolicyId>B2C_1A_TrustFrameworkExtensions</PolicyId>
</BasePolicy>
<BuildingBlocks>
<ClaimsSchema>
<ClaimType Id="one-time-code-test">
<DisplayName>one-time-code-test</DisplayName>
<DataType>string</DataType>
<UserHelpText>This is one time code for test</UserHelpText>
<UserInputType>TextBox</UserInputType>
</ClaimType>
</ClaimsSchema>
</BuildingBlocks>
<ClaimsProviders>
<ClaimsProvider>
<DisplayName>Test01 Provider</DisplayName>
<TechnicalProfiles>
<TechnicalProfile Id="SelfAsserted-LocalAccountSignin-Email">
<DisplayName>Local Account Signin</DisplayName>
<Protocol Name="Proprietary" Handler="Web.TPEngine.Providers.SelfAssertedAttributeProvider, Web.TPEngine, Version=1.0.0.0, Culture=neutral, PublicKeyToken=null" />
<Metadata>
<Item Key="SignUpTarget">SignUpWithLogonEmailExchange</Item>
<Item Key="setting.operatingMode">Email</Item>
<Item Key="setting.forgotPasswordLinkLocation">None</Item>
<Item Key="ContentDefinitionReferenceId">api.selfasserted</Item>
</Metadata>
<IncludeInSso>false</IncludeInSso>
<InputClaims>
<InputClaim ClaimTypeReferenceId="signInName" />
</InputClaims>
<OutputClaims>
<OutputClaim ClaimTypeReferenceId="signInName" Required="true" />
<OutputClaim ClaimTypeReferenceId="password" Required="true" />
<OutputClaim ClaimTypeReferenceId="objectId" />
<OutputClaim ClaimTypeReferenceId="authenticationSource" />
<OutputClaim ClaimTypeReferenceId="one-time-code-test" />
</OutputClaims>
<ValidationTechnicalProfiles>
<ValidationTechnicalProfile ReferenceId="login-NonInteractive" />
<ValidationTechnicalProfile ReferenceId="Check-OneTimeCode" />
</ValidationTechnicalProfiles>
<UseTechnicalProfileForSessionManagement ReferenceId="SM-AAD" />
</TechnicalProfile>
<TechnicalProfile Id="Check-OneTimeCode">
<DisplayName>Check OneTimeCode with External Custom REST</DisplayName>
<Protocol Name="Proprietary" Handler="Web.TPEngine.Providers.RestfulProvider, Web.TPEngine, Version=1.0.0.0, Culture=neutral, PublicKeyToken=null" />
<Metadata>
<Item Key="ServiceUrl">https://xxxxx.azurewebsites.net/b2c-test.php</Item>
<Item Key="AuthenticationType">None</Item>
<Item Key="AllowInsecureAuthInProduction">true</Item>
<Item Key="SendClaimsIn">Body</Item> <!-- incoming format -->
<Item Key="ClaimsFormat">Body</Item> <!-- returning format -->
</Metadata>
<InputClaims>
<InputClaim ClaimTypeReferenceId="one-time-code-test" DefaultValue="" />
</InputClaims>
</TechnicalProfile>
</TechnicalProfiles>
</ClaimsProvider>
</ClaimsProviders>
<UserJourneys>
<UserJourney Id="TrivialOneTimePassJourney">
<OrchestrationSteps>
<OrchestrationStep Order="1" Type="ClaimsProviderSelection" ContentDefinitionReferenceId="api.idpselections">
<ClaimsProviderSelections>
<ClaimsProviderSelection TargetClaimsExchangeId="FacebookExchange" />
<ClaimsProviderSelection TargetClaimsExchangeId="LocalAccountSigninEmailExchange" />
</ClaimsProviderSelections>
</OrchestrationStep>
<OrchestrationStep Order="2" Type="ClaimsExchange">
<ClaimsExchanges>
<ClaimsExchange Id="FacebookExchange" TechnicalProfileReferenceId="Facebook-OAUTH" />
<ClaimsExchange Id="LocalAccountSigninEmailExchange" TechnicalProfileReferenceId="SelfAsserted-LocalAccountSignin-Email" />
</ClaimsExchanges>
</OrchestrationStep>
<OrchestrationStep Order="3" Type="ClaimsExchange">
<Preconditions>
<Precondition Type="ClaimEquals" ExecuteActionsIf="true">
<Value>authenticationSource</Value>
<Value>localAccountAuthentication</Value>
<Action>SkipThisOrchestrationStep</Action>
</Precondition>
</Preconditions>
<ClaimsExchanges>
<ClaimsExchange Id="AADUserReadUsingAlternativeSecurityId" TechnicalProfileReferenceId="AAD-UserReadUsingAlternativeSecurityId-NoError" />
</ClaimsExchanges>
</OrchestrationStep>
<OrchestrationStep Order="4" Type="ClaimsExchange">
<Preconditions>
<Precondition Type="ClaimsExist" ExecuteActionsIf="true">
<Value>objectId</Value>
<Action>SkipThisOrchestrationStep</Action>
</Precondition>
</Preconditions>
<ClaimsExchanges>
<ClaimsExchange Id="SelfAsserted-Social" TechnicalProfileReferenceId="SelfAsserted-Social" />
</ClaimsExchanges>
</OrchestrationStep>
<OrchestrationStep Order="5" Type="ClaimsExchange">
<Preconditions>
<Precondition Type="ClaimEquals" ExecuteActionsIf="true">
<Value>authenticationSource</Value>
<Value>socialIdpAuthentication</Value>
<Action>SkipThisOrchestrationStep</Action>
</Precondition>
</Preconditions>
<ClaimsExchanges>
<ClaimsExchange Id="AADUserReadWithObjectId" TechnicalProfileReferenceId="AAD-UserReadUsingObjectId" />
</ClaimsExchanges>
</OrchestrationStep>
<OrchestrationStep Order="6" Type="SendClaims" CpimIssuerTechnicalProfileReferenceId="JwtIssuer" />
</OrchestrationSteps>
<ClientDefinition ReferenceId="DefaultWeb" />
</UserJourney>
</UserJourneys>
<RelyingParty>
<DefaultUserJourney ReferenceId="TrivialOneTimePassJourney" />
<TechnicalProfile Id="OneTimePassTest">
<DisplayName>OneTimePassTest</DisplayName>
<Protocol Name="OpenIdConnect" />
<OutputClaims>
<OutputClaim ClaimTypeReferenceId="displayName" />
<OutputClaim ClaimTypeReferenceId="givenName" />
<OutputClaim ClaimTypeReferenceId="surname" />
<OutputClaim ClaimTypeReferenceId="email" />
<OutputClaim ClaimTypeReferenceId="objectId" PartnerClaimType="sub"/>
<OutputClaim ClaimTypeReferenceId="identityProvider" />
<OutputClaim ClaimTypeReferenceId="tenantId" AlwaysUseDefaultValue="true" DefaultValue="{Policy:TenantObjectId}" />
</OutputClaims>
<SubjectNamingInfo ClaimType="sub" />
</TechnicalProfile>
</RelyingParty>
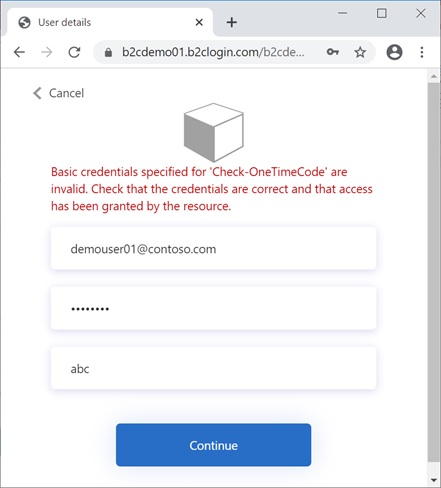
</TrustFrameworkPolicy>In this trivial example, when the user has filled the wrong one-time code, the login will be rejected as follows.
Now you have learned an idea of custom policy !
Let’s go into the following samples and learn more advanced scenarios in this example.
GitHub – Azure Active Directory B2C: Custom User Journeys
https://github.com/azure-ad-b2c/samples
Categories: Uncategorized

Hello Tsuyoshi, this is a great article.
I’m trying to add Sign In with Slack as an Identity Provider. But having trouble sending the “user_scope” param in the request as the OAuth2 Technical Profile only accepts “scope”.
Anywhere you can point me to to approach this?
LikeLike
Hi, Martin-san,
Technical profile with standard protocols – such like, OpenID, OAuth1, OAuth2, or SAML – in B2C is aligning strictly the standard specification in rfc. Then you might not be able to use “user_scope” in a technical profile with standard OAuth protocol in B2C.
https://tools.ietf.org/html/rfc6749
The slack OAuth document says as below, but you’re needing “user_scope” instead of “scope” parameter indeed ?
https://api.slack.com/authentication/oauth-v2
“The scope list requests scopes for your app’s bot user. If you have specific need for a user token (say, to act on behalf of a user), provide a user_scope parameter with requested user scopes instead of, or in addition to, the scope parameter.”
LikeLiked by 1 person
Ok, thank you, I haven’t read that doc before. I was using this one: https://api.slack.com/docs/sign-in-with-slack It helped me understand that v2 was about their api and not about the OAuth version
I’m not trying to use a bot at the moment, just allow Slack users to login to a web app using Slack SSO.
I was just able to make it work with their v2 endpoint by just not using the scope metadata item in the Technical Profile, but using an input claim.
Now I’m getting an Exception on the b2c side after login in with Slack:
AADB2C: An exception has occurred.
An invalid OAuth response was received
LikeLike
Hi Tsuyoshi,
I have couple of questions:
1. I have a requirement to suppress the self-asserted page popping up in the external IDP authentication flow. Is there any chance to achieve? All the mandatory claims will be pre-filled by one of our Technical Profile in the InputClaims?
2. In the InputClaim there is a DefaultValue attribute can be set, how to set value of this claim referring other incoming claim value (from an external IDP)? I understand from this link, https://docs.microsoft.com/en-us/azure/active-directory-b2c/claim-resolver-overview, we should use {Claim:profile} (when profile is one of incoming claim), but this fails to resolve the key and “{Claim:profile}” becomes a new input claim value
LikeLike
Hi, Naveen-san,
I haven’t experimented below settings, but can you please try it ?
Question 1 :
As you can see definitions in TrustFrameworkBase.xml (starter pack), AAD-UserWriteUsingAlternativeSecurityId (which writes an user object into the internal repository, Azure AD, using alternativeSecurityId) is used in SelfAsserted-Social technical profile (which shows self-assertion UI).
Then, how about to call AAD-UserWriteUsingAlternativeSecurityId directly in your user journey ?
Question 2 :
If you want to set the default value for claims in external provider, such like “authenticationSource” in TrustFrameworkBase.xml, how about to set the default value in external provider’s technical profile as follows ?
<ClaimsProvider>
<Domain>facebook.com</Domain>
<DisplayName>Facebook</DisplayName>
<TechnicalProfiles>
<TechnicalProfile Id="Facebook-OAUTH">
<DisplayName>Facebook</DisplayName>
<Protocol Name="OAuth2" />
…
<OutputClaims>
…
<OutputClaim ClaimTypeReferenceId="yourClaimType" DefaultValue="youDefaultValue" AlwaysUseDefaultValue="true" />
</OutputClaims>
…
</TechnicalProfile>
</TechnicalProfiles>
</ClaimsProvider>
LikeLike
Hi,
I’ve read your article with great interest and it certainly boosted my knowledge of the B2C Custom Policies. Our business implemented a custom policy but we only want to use it for sign-in. For sign-up and password reset, we want to redirect the user to pages of our internal account management application. How can we implement this using the custom policies?
LikeLike
Sorry for my late response. What you need is “only needing sign-In (implementation for OIDC, etc)” and “doesn’t need the user management including the user repository” ?
B2C is based on the architecture of storing the user attributes in B2C repository, which is built on Azure AD. Even when using the external ID (such as, facebook, google, and so on), the asserted user object is stored in B2C repository (Azure AD tenant) as a process of application’s sign-up in usual cases, after signing-in with external identity for the first time. In the next time to login, this asserted object in the repository is referred for sign-in and issuing user token. (Of course, the external identity is still used for sign-in.)
It might be possible to implement only sign-in without any management in B2C (since you can customize UI in B2C for providing the link for the external management, and you can also interact with your custom repository using RestfulProvider), however this kind of use case will need much more works to design and implement.
LikeLike
Hi,
Very detailed explanation on custom policies.
We are using local user, with user name, sign in. An email is used under Authentication contact screen for mfa and sspr. Is there a way to update the email by using custom policy or any other method?
LikeLike
You can update the user object with technical profiles based on “AAD-Common” in B2C startpack, such like, “AAD-UserWriteUsingLogonEmail”, “AAD-UserWriteProfileUsingObjectId”, … and you can also update e-mail in the same way.
LikeLike
Hi,
thanks for this great article.
I wonder if it would be possible to send registration links by email instead of B2C’s default one-time-code.
The link would lead to self-asserted signup page.
Do you think that could be possible?
LikeLike
Sorry for my late response. (I missed this comment.)
Current framework customization for e-mail verification seems to be limited. (See below.)
https://feedback.azure.com/forums/169401-azure-active-directory/suggestions/15334335-fully-customizable-verification-emails
You can also customize the user interface and the logic in e-mail verification by writing your own custom policy (see below), however, in the scenario which you need, the verification might not be real-time (i.e, the user might open the e-mail and click the link after a while), then I think you should implement by taking other approaches with custom policies.
https://github.com/azure-ad-b2c/samples/tree/master/policies/custom-email-verifcation
One possible implementation is to suspend the completion of sign-up by registering the user and saving some attribute (flag) as one of claims. By checking this attribute, your custom policy can block the user to login, when the user is not validated by e-mail. (See “Disable and lockout an account after a time period” sample in GitHub.)
When this user has opened and clicked the link in e-mail, then this attribute should be changed by using Microsoft Graph or MSAL in your application page. (Please take care for implementing this process, since this site might be public for everyone. The duration time for validation will also be limited, then you should implement this process.)
After the e-mail verification is completed, the user will proceed to login with B2C, then your custom policy will check this attribute (which tells whether this user has already verified or not) and proceed (or block) login.
LikeLike
This sample (below) might also help you implement.
https://github.com/azure-ad-b2c/samples/tree/master/policies/sign-in-with-magic-link
LikeLike
Thanks for the fantastic article. Is there any way to set “block sign-in” for new users by default? I mean when new user signs up they should be in blocked state. And the admin should review and enable sign in for them if they are valid users.
LikeLike
Yes. See the following “Disable and lockout an account after a time period” example. This example saves the current time as a claim in repository (Azure AD) on signing-up, then it reads this saved attribute and compares when the user signs-in. (If it doesn’t meet the condition, it will block the sign-in.)
https://github.com/azure-ad-b2c/samples/tree/master/policies/disable-inactive-account
LikeLike
Thanks for your reply. Really appreciated.
I will give a try.
LikeLike
Your post has been a real gold mine for me ! Thank you very much . It really clarifies how custom policies works! Again Thank you very very very much.
Best regards from Quebec, Canada
LikeLike
Everything is very open with a precise description of the issues.
It was truly informative. Your website is useful.
Thank you for sharing!
LikeLike
Hi ,
Can you let me know what will I need to add in the output claim of my technical profile to get the email address of the logged in user if the external provider is Azure AD? I have tried with ClaimTypeReferenceId=”signInNames.emailAddresses” for local/social accounts and it worked. But it is not working for single / multi tenant Azure AD as claimsprovider.
LikeLike
I think that “preferredUsername” is what you are looking for.
LikeLike
Sorry, I should say “preferred_username”.
LikeLike
Hi,
Thanks for a great article!!
I have a question… Is their a way to add field such id numer/ password number and use mfa with phone where the user uniqe id will be the id number/passport number?
If yes what starter should I start. And do you have any tips for doing this.
Thanks,
Alon
LikeLike
Hello Tsuyoshi San,
Thanks for the awesome article. I was stuck in order to how to add two external IDP. for example let say google and linkedin. I have followed the above article n steps in Microsoft doc. and was replace Facebook with google details to create SAML type IDP . But now I want to add LinkedIn as well. can you please share any example code or how we can achieve this?
Thanks,
Sis
LikeLike
Thanks very much! This is exactly what I was looking for and microsoft documentation is sorely lacking!
LikeLike
Hi, the image links are broken.
LikeLike
Hi Tsuyoshi,
First of all thank you very much for such a great article. This article has indeed broaden my knowledge towards Azure B2C policies. We are also using custom B2C policy in our project where we have built up different policies for Sign up, Sign in (Phone number + Password combination) and password reset.
Now we have got another requirement that apart from normal user journeys (sign up, sign in , password reset) which we have built, we also need to have capability so that user can login to the application using his phone number and OTP.
Is it possible to create a new user journey and a technical profile to achieve this? Can you please guide how can we proceed in Azure custom policy?
LikeLike
Thank you for your feedback.
Yes, there exist custom policy samples for both phone verification and TOTP. Please see below.
https://github.com/azure-ad-b2c/samples
LikeLike
Hello,
I wanted to ask if you have any information regarding how to change the wording on the sign in page. In your examples the wording is “Sign in with”, is it possible to change it to “Sign into your account”?
LikeLike
Hello Tsuyoshi Matsuzaki just want to say THANK YOU VERY MUCH for this work. Microsoft should give you some royalties with the money they saved writing their official AAD docs because at the end your are helping people to use their platform.
LikeLike
Thank you for this walk through, which fills many gaps in my understanding (based on the Microsoft documentation). You explain “why” as well as “what” and the examples you give a useful in real applications. Kudos.
LikeLike
is there any way to configure login and registration with saml and mfa (sms/email) ?
LikeLike
Great Article.
I want to integrate the Steam login identity provider into the Application in B2C. Can you please help me how can I add identity provider using custom polices?
LikeLike
Hi Tsuyoshi
I’m looking for Login, Forget Password and Logout custom polices.
My app should follow the workflow for local azure b2c user login, forget password and logout.
And on logout it should not access the application again, user have to login again.
Do you have any sample for this specific requirement?
LikeLike